
:max_bytes(150000):strip_icc():format(webp)/duetinslides-fd2c11f1a91a4d7388cc25f2f4719cca.jpg)
What Does Enter PUK Code Mean And Why Did The Sim Get PUK Blocked On Nokia C32 Device
What Does ‘Enter PUK Code’ Mean And Why Did The Sim Get PUK Blocked On Nokia C32 Device
If your SIM card is disabled, you probably entered the incorrect PIN code too frequently. Your SIM locks itself after three to five wrong inputs, on average. Although it might be annoying, doing these guards against unauthorized access to your phone and personal data. If your cell phone is lost or stolen, PUK blocked will prevent prospective hackers from making calls.
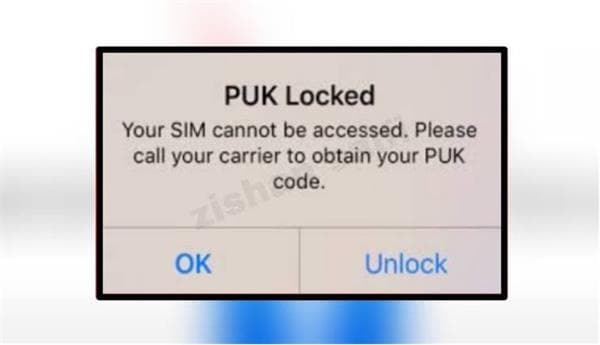
Your mobile phone display can say “PIN blocked” or “Enter PUK code.” PUK stands for PIN Unblocking Key in the PUK code. The PUK code is seldom given to you when you receive your membership in the US. Contact Your Nokia C32 provider’s customer support if you don’t know your PUK code.
Part 1: Why Was My Sim Card Blocked?
1. 3 times incorrect Pin entered
Sometimes when you forget your pin and keep on entering the wrong one, you can get PUK Blocked. You can utilize three to five chances, and your sim gets blocked when you enter the incorrect pin in all of these attempts.
2. Wrong PUK code entered
Sims are frequently blocked; therefore, if you have your PUK, keep it in a secure location separate from your phone. This is because it is the key to unlocking your SIM. The SIM will be permanently disabled, and you will have to buy a new SIM card if you input the wrong PUK ten times in a row.
Part 2: What To Do When I Blocked My Sim Card?
Your SIM card has been disabled to protect your security if you enter three wrong PINs and your phone shows “SIM card banned” or “Enter PUK code”.
You must input a PUK (PIN Unlock Key) code to unlock your SIM card.
Go to your phone’s settings to customize your PIN code after using a PUK code to unlock your SIM card. Pick a PIN that is simple to remember.
If your PUK code was delivered to you by email:
You got an email with multiple codes, including PUK1, PIN2, and PUK2.
If your PIN is locked, use PUK1 to unlock it.
Only a few phones employ PIN2 and PUK2 codes to restrict access to certain SIM card functionalities.
PIN2: The default code for your SIM card; If this code has been altered, use the PUK2 code to restore it.
PUK2: Your PIN2’s unlock code if it has been blocked.
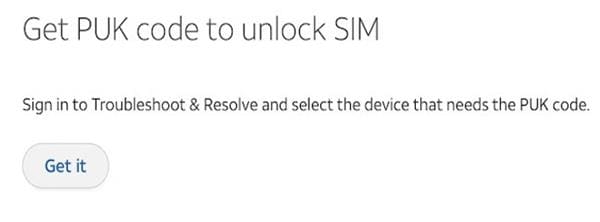
Part 3: How Can I Have My PUK Code To Unlock Sim Card?
1. Get it from sim card packaging
The packing box is the best and easiest place to look for the PUK code to unlock your SIM card.
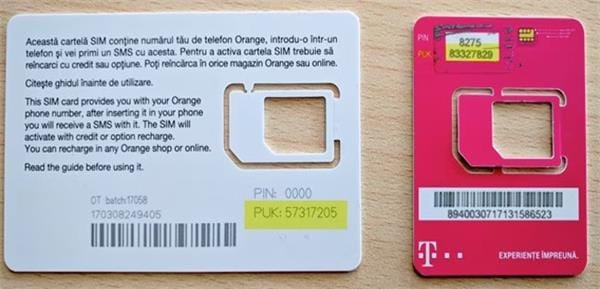
You probably have memories of the flat plastic package you got when you bought a SIM card. Your PUK and default SIM pin code should be written on the package.
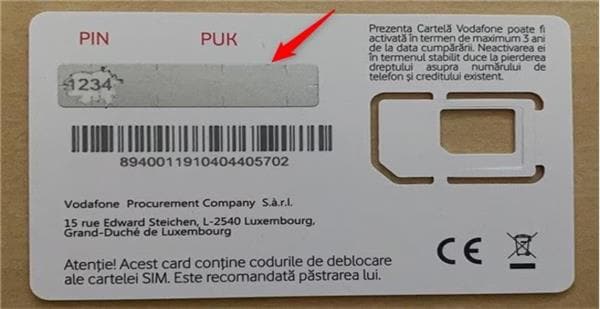
Please look around your home for the package and look on the back for the key. On some older packaging, it could be sealed behind a scratchable region, whereas on other, more recent ones, you might find it unsealed.
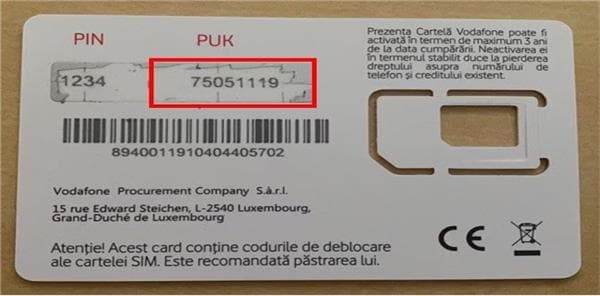
In either case, the correct PUK has 8 numbers and should be simple to enter to unlock your SIM card.
2. Have it from carrier website
In all honesty, I doubt I’ll ever be able to locate my SIM card package again, and I imagine most people feel the same way.
But happily, a lot of cell companies let you access your account on their app or website to check your SIM card PUK. Please log in to the appropriate website or app, then go to your profile to see whether anything about “PUK” is available there.
It shouldn’t be an issue if you were utilizing or signed in to the platform before your SIM was disabled. However, if not, you might not be able to access anything since you could be asked to input an OTP to verify your identity.
Please remove the SIM card and try again if you can’t access your phone to utilize the app or website because of the SIM lock. After receiving the PUK code, you can re-insert the SIM and input it.
3. Contact your carrier
It’s time to call customer support, which should be simpler for most individuals if none of the above options work for you. For example, your mobile service provider created your SIM card. Therefore, they have all the information you would require. Before they divulge anything to you, though, they should be able to verify your identity.
Use a different phone to call your customer service number and describe the issue. And following a series of inquiries, they should offer your PUK number as identification.
However, customer service won’t release the code if you can’t back yourself up. And at that point, there’s probably nothing further you can do. Therefore, make sure you have some information, such as your name, address, date of birth, etc., before you call them.
Part 4: Easy Tool For Sim Card Unlock
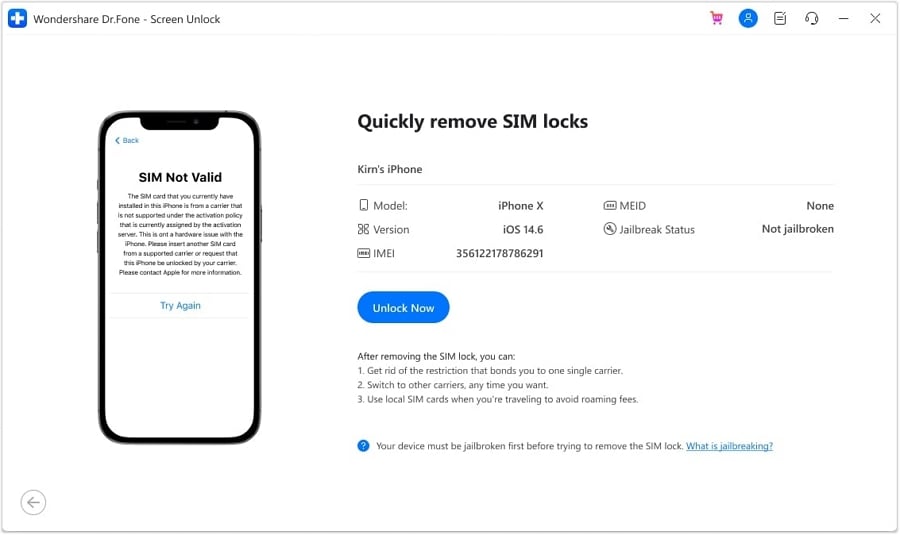
If you want to unlock your PUK blocked sim card, you can use a network unlock tool like Dr.Fone. With Dr.Fone - Screen Unlock (iOS) , you can remove the PUK block on your sim card instantly. You don’t have to contact your network carrier or search for the PUK code, as you can use your PC to unlock any sim card.
Dr.Fone enables users to unblock their sim cards within minutes. It is a fast, safe, and easy-to-use tool that works as a one-stop solution for any of your smartphone-related issues. Before you try to unblock your sim card with Dr.Fone, do remember that this feature is only for iPhones and iPads. Here is how you can use Dr.Fone to open your PUK blocked sim card.
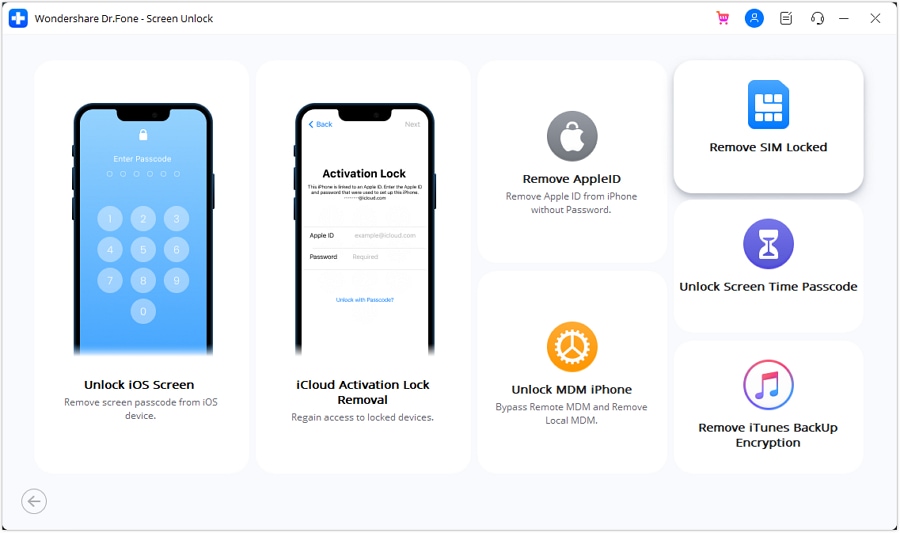
- Open Dr.Fone on your PC. After launching the application, select the “Screen Unlock” tab from the homepage to access the “SIM unlock” tool.
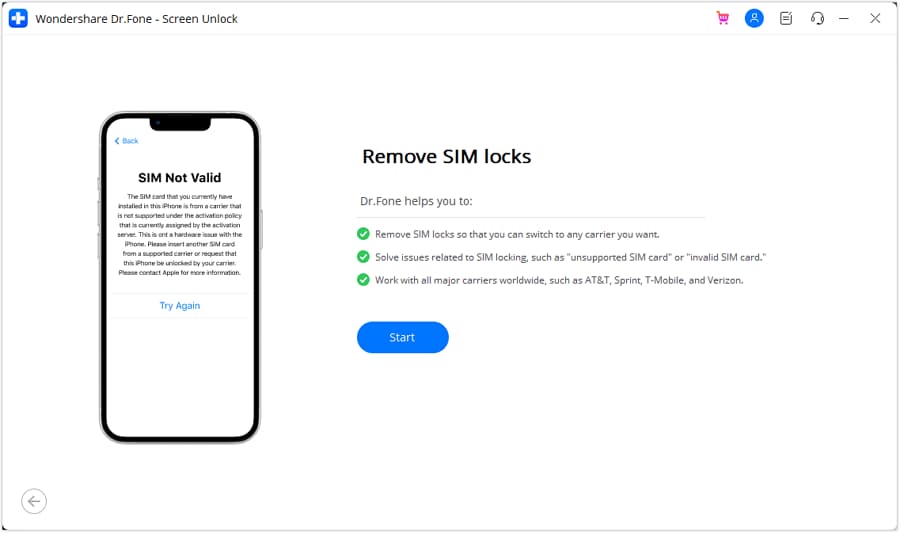
- Next, select the “Remove SIM Locked” option on the next page. The sim unlock feature is only available for iPhones and iOS devices.
- Use a USB cable to connect your PC and iPhone. After you ensure that your device is connected, click on the “Start” option to begin the sim unlock process.
- Now, Dr.Fone will check your iOS device and show its information for verification. Click on the “Unlock Now” option if it’s correct.
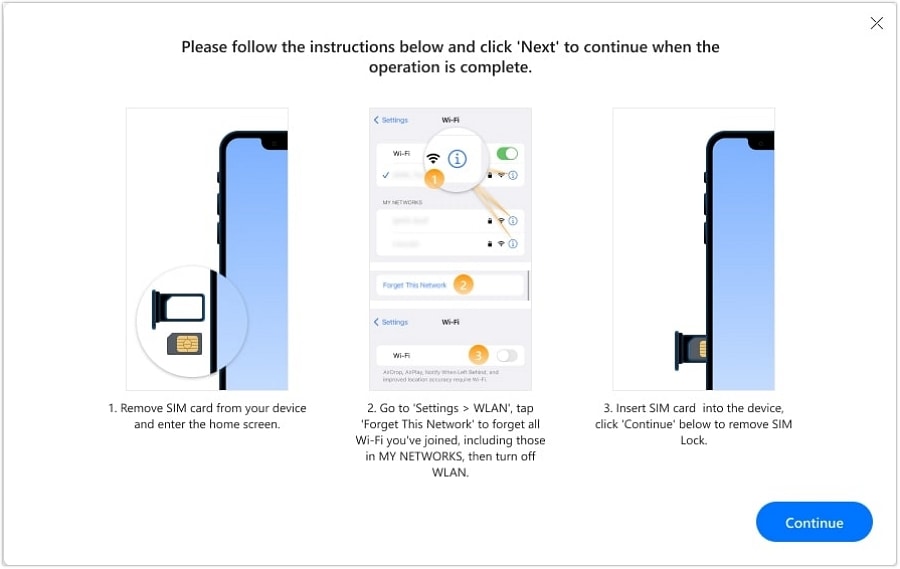
- The iPhone sim unlock will not work without a jailbreak, so you have to do it before the system start removing the sim lock. You can follow the guide about how to jailbreak your iPhone provided by Dr.Fone. The unlock process runs well with devices of iOS 12 to iOS 14.8.1.
- Now, you have to finish three easy steps to set up your iPhone. First, extract the sim card from your device. And follow the following steps. After this, click on the “Continue” option.
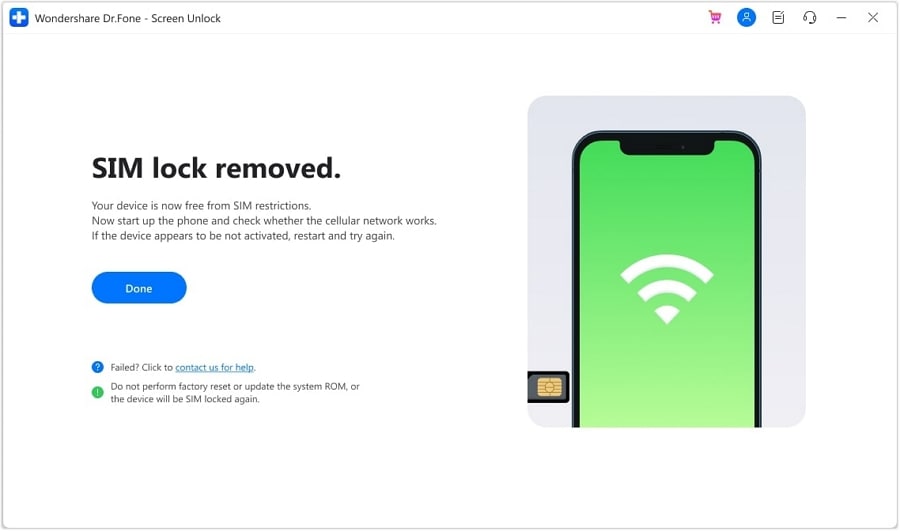
- After you complete these steps, Dr.Fone will directly remove the sim lock on your device. You can view the progress on your screen. The process will not take a long time to complete, so you only have to wait for a few minutes.
- After Dr.Fone ends the sim unlock process, there will be no sim restrictions on your iOS device. It means you can use sim cards from any network carrier. Now, click on the “Done” option after your task is complete.
Conclusion
People who still have their SIM pack shouldn’t have trouble figuring out “how to acquire a PUK code to unlock a SIM card”. However, for those without it, getting in touch with customer service may be the only option. As long as your SIM card has accurate information, this process should be simple.
Once you have the proper PUK to unlock your SIM card , don’t be reluctant to write it down somewhere you can easily find it later. It might not be a terrible idea to store it on your Google Drive. This way, you will not see PUK blocked, as you know how to unlock PUK blocked sim card.
Tutorial to Change Nokia C32 IMEI without Root: A Comprehensive Guide
As an Android device user, you may have come across a situation where you need to change your device IMEI number. The International Mobile Equipment Identity (IMEI) is a unique 15-digit number assigned to every mobile device, such as smartphones and tablets. This number serves as an identifier, helping to distinguish your device from millions of others. One of the main reasons people want to change their Android IMEI number is to unblock a device that has been blacklisted by their network provider. Other reasons include accessing certain network features and services or maintaining anonymity.
Changing your Android IMEI without root access may seem like a daunting task, but this comprehensive guide will walk you through the process step-by-step. Before proceeding, please note that altering your device’s IMEI number can be illegal in some countries, and may void your warranty. Proceed with caution and at your own risk. Get to know how to change IMEI number now!
Part 1: What is IMEI and Why People Change The IMEI Number
The International Mobile Equipment Identity (IMEI) is a unique identifier for every mobile device. It allows network providers and manufacturers to track and block devices if they are reported as lost or stolen. Changing your device’s IMEI can help to unblock a blacklisted device, access certain network features and services, or maintain anonymity. However, be aware that altering your IMEI number is illegal in some countries and may void your warranty.

There are several uses of the IMEI number
- As the use of mobile devices increases, the statistics of stolen and lost devices have been increasing as well. Users can block stolen or lost devices for further usage if they know their IMEI number. All users need to call their network carrier and report that the Nokia C32 device is stolen or lost. The carrier can block the specific device from running on their network and notify other carriers.
- The 15-digit IMEI number indicates the origin and model of the Nokia C32 device. The first eight digits indicate the Nokia C32 device’s origin and its model while the last six digits identify the Nokia C32 device’s manufacturer.
- If you subscribe to a mobile tracking service, you can use the IMEI number to track the Nokia C32 device—even if it uses a different SIM card.
Pros and Cons of Changing Android IMEI
Like many other things out there, changing Android IMEI has both advantages and disadvantages. Here are some of them:
Advantages
- Make your Android untraceable. By constantly changing your IMEI, you will throw off the tracks of people using it to stalk you!
- Fix any invalid IMEI-related issues such as lost or invalid IMEI numbers. Once you change your IMEI, your Android device with the same benefits and features.
- Obtaining a completely new device ID.
- Changing the IMEI number to one that indicates it is a newer model, you will be able to enjoy new OS updates by resetting, repairing, and updating your Android device.
- Have you ever yearned for that cheap BlackBerry plan your network carrier keeps on promoting? The 15-digit IMEI indicates the origin and model of your device. Therefore, by changing your Android’s IMEI number to that of a BlackBerry’s, you will be able to subscribe to a cheaper mobile plan.
Disadvantages
- Before we begin, we need to make it clear that the process of changing IMEI without root can be illegal in some countries. We advise you to check the laws and regulations in your country before attempting to change your device’s IMEI number. As far as we know, it is legal in Africa and Asia, and illegal in Europe.
- The IMEI number is hardcoded into your device. Therefore, changing your device’s IMEI number may void your device warranty and cause other issues such as network problems and software instability.
- Legally, you have forfeited your ownership of your mobile device. When you purchase your device, the seller will jot down the original IMEI number on your receipt. So if you changed your IMEI and lost it, you may not be able to claim it. This is because authorities cannot see if it is truly yours. After all, the IMEI numbers no longer correlate with each other.
Part 2: How to Find the IMEI on an Android? (5 Ways)
It is essential to know your Android device’s IMEI for various reasons, such as registering the Nokia C32 device, reporting it as stolen or lost, checking warranty status, or verifying its authenticity. In this part, we will walk you through the various methods on how to find the IMEI on your Android device.
Method 1: Locate IMEI through the Settings App
One of the easiest ways to find the IMEI number on your Android device is through the Settings app. Follow these simple steps:

- Step 1: Open the “Settings” app on your Android device.
- Step 2: Scroll down and tap on “About phone” or “About device”.
- Step 3: Tap on “Status” or “IMEI information”.
- Step 4: You will see your IMEI number displayed on the screen. Note this down or take a screenshot for reference.
Method 2: Use the Dialer App
Another quick method to find the IMEI number is by using the dialer app on your Android smartphone. Here’s how:
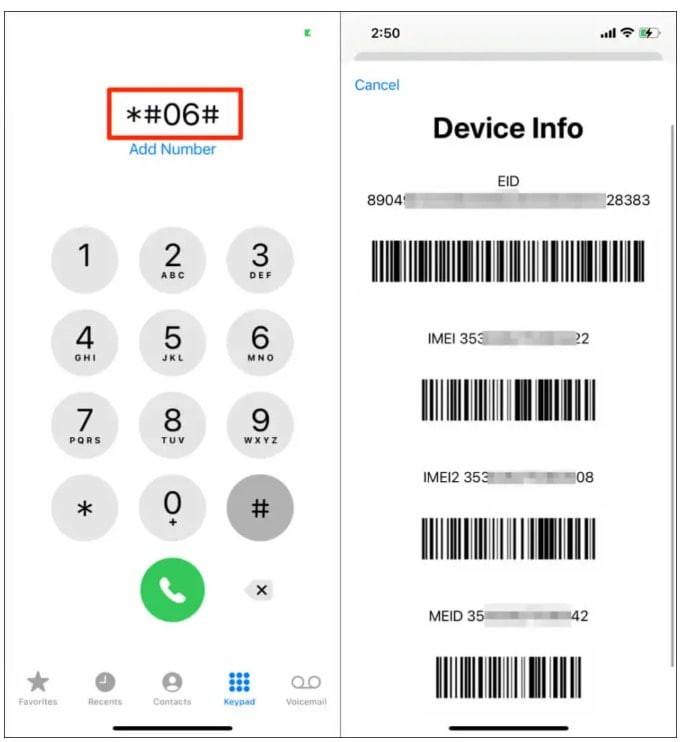
- Step 1: Open the “Phone” app or “Dialer” app on your Android device.
- Step 2: Dial *#06# on the keypad.
- Step 3: The IMEI number will be displayed on the screen. Note it down or take a screenshot for reference.
Method 3: Check the Nokia C32 device Packaging or Receipt
If you still have the original packaging or receipt for your Android device, you may find the IMEI number printed on it. Look for a label or sticker on the box that contains the Nokia C32 device’s details, including the IMEI number.
Method 4: Find IMEI on a Removable Battery (for older devices)
For older Android devices with removable batteries, you can find the IMEI number printed on a sticker underneath the battery. To locate it, follow these steps:

- Step 1: Power off your Android device.
- Step 2: Remove the back cover and take out the battery.
- Step 3: Look for a sticker or printed text with the IMEI number.
- Step 4: Note it down or take a photo for reference.
Method 5: Check the SIM Card Tray
Some Android devices have the IMEI number printed on the SIM card tray. To check if your device has this feature:

- Step 1: Power off your Android device.
- Step 2: Use the SIM card removal tool (or a paperclip) to eject the SIM card tray.
- Step 3: Look for the IMEI number printed on the tray.
- Step 4: Note it down or take a photo for reference.
Part 3: Does IMEI Change With SIM Card?
No, swapping or changing the SIM card does not alter the IMEI (International Mobile Equipment Identity). The IMEI persists unchanged throughout the Nokia C32 device’s lifetime, functioning as a distinctive identifier solely for that particular device.
The IMEI is a 15-digit code assigned to each mobile device. It’s separate from the SIM card, which stores information related to the subscriber and the carrier network. The SIM card contains data specific to the subscriber. This includes contacts, text messages, and network-related information. But it does not alter or affect the IMEI of the Nokia C32 device.
The IMEI remains the same even if you change SIM cards or switch between different carriers. It’s essentially a static identifier tied to the Nokia C32 device’s hardware. It is used by mobile networks and authorities to identify and track devices on the network.
Part 4: Does IMEI Change After Factory Reset?
No, performing a factory reset on your mobile device does not change its IMEI (International Mobile Equipment Identity). The IMEI is a unique identifier assigned to the hardware of the Nokia C32 device. It remains constant throughout the life of the Nokia C32 device, irrespective of any software changes or resets.
A factory reset wipes the data and settings on your device, returning it to its original factory state. This process erases user-installed apps, personal data, and settings. But it doesn’t affect the Nokia C32 device’s hardware identification, including the IMEI.
The IMEI is embedded into the hardware of the Nokia C32 device. It is typically printed on the Nokia C32 device’s packaging or can be found by dialing *#06# on the phone’s keypad. It’s a crucial identifier for mobile networks, and authorities use it to uniquely identify and track devices across networks. It remains unchanged even after a factory reset.
Part 5: Requirements for Changing Android IMEI without Root
Before you begin the process of changing your Android IMEI without root, there are a few things you will need:
- A compatible Android device: The methods detailed in this guide are specifically for MediaTek (MTK) devices. Ensure that your device has a MediaTek chipset before proceeding..
- A new IMEI number: You’ll need a valid IMEI number to replace the current one on your device. You can either generate one using an IMEI generator tool or use the IMEI number of an old, unused device..
- A stable internet connection: Some of the methods require you to download apps and modules, so make sure you have a stable Wi-Fi connection.
- Back up your Android phone: Before making any changes to your device, it is always recommended to backup your data. This will help you to avoid any data loss in case anything goes wrong during the process. You can back up your device data using Google Backup or a local backup software like Wondershare Dr.Fone .
Wondershare Dr.Fone is a tool that helps you keep your important data safe. It can back up all the important information on your Android phone or tablet, like photos, music, videos, contacts, and more and is compatible with over 8000 Android devices. The backup process is easy and only takes a few clicks. You can also restore your backup to any device you want, and choose which data you want to restore. This is a great way to make sure you never lose your important information!
Part 6: How to Change Android IMEI Number without Root?
There are several methods to change your Android IMEI without root access. This tutorial will cover three popular methods: using MobileUncle Tools, Xposed Installer and IMEI Changer Pro, and MTK Engineering Mode.
1. Using Xposed Installer and IMEI Changer Pro

This IMEI changer Android app is built to allow a user to change the series of numbers that make up their devices’ IMEI identification. Randomized IMEI numbers will be generated every time the app is used. However, users can type in a new IMEI number in the text field if they have a specific number in mind. This no-ads app is really simple to use–to complete the change, a user will only need to click the “Apply” button and restart their devices. Its interface is also simple enough for easy navigation.
This method involves using the Xposed Installer app to install the IMEI Changer Pro module. Follow the steps below:
- Step 1: Download and install the Xposed Installer app from a trusted source.
- Step 2: Open the app and go to the “Framework” section. Tap on “Install/Update” to install the Xposed Framework on your device. Reboot your device once the installation is complete.
- Step 3: Download and install the IMEI Changer Pro app from a trusted source.
- Step 4: Launch the Xposed Installer app again, and go to the “Modules” section. Enable the IMEI Changer Pro module by checking the box next to it.
- Step 5: Reboot your device for the changes to take effect.
- Step 6: Open the IMEI Changer Pro app and enter your new IMEI number in the provided field.
- Step 7: Tap on the “Apply” button, and then restart your device. Your new IMEI number should now be active.
2. Using MobileUncle Tools

MobileUncle Tools is a simple Android application that can retrieve your Android device’s information, back up IMEI, change its IMEI, and search for its recovery files. It will also be able to assist you with any rebooting needs and many more!
Follow these steps to change your IMEI using MobileUncle Tools:
- Step 1: Download the MobileUncle Tools app from a trusted source and install it on your device.
- Step 2: Open the app and grant the necessary permissions.
- Step 3: From the main menu, select “Engineer Mode”.
- Step 4: In the Engineer Mode, select “MTK”.
- Step 5: Scroll down and tap on “Connectivity”.
- Step 6: Next, tap on “CDS Information”.
- Step 7: Select “Radio Information”.
- Step 8: You will see two options: Phone 1 and Phone 2. Choose the one corresponding to the SIM slot for which you want to change the IMEI.
- Step 9: In the input field, type “AT+EGMR=1,7,” followed by your new IMEI number within double quotes. For example: AT+EGMR=1,7,”123456789012345”.
- Step 10: Tap on the “Send AT Command” button. You should see a message confirming that the command has been sent successfully.
- Step 11: Restart your device. The new IMEI number should now be active.
3. Using MTK Engineering Mode
![]()
MTK Engineering Mode is another app designed for MediaTek devices that allows users to access hidden settings and options. It was specifically made for Taiwanese device manufacturers such as Tecno, Infinix, Elephone, Oppo, Chuwi, etc. While not fully recommended, reports have been that it works with Android devices made by non-Taiwanese manufacturers. Its clean interface makes navigating the app seamlessly.
Follow these steps to change your IMEI using MTK Engineering Mode:

- Step 1: Download and install the MTK Engineering Mode app from a trusted source.
- Step 2: Launch the app and select “MTK Settings”.
- Step 3: Scroll down and tap on “Connectivity”.
- Step 4: Next, tap on “CDS Information”.
- Step 5: Select “Radio Information”.
- Step 6: Choose either Phone 1 or Phone 2, depending on the SIM slot for which you want to change the IMEI.
- Step 7: Enter the following command in the input field: AT+EGMR=1,7,”Your_New_IMEI_Number”.
- Step 8: Tap on the “Send AT Command” button. A confirmation message should appear.
- Step 9: Restart your device, and the new IMEI number should be active.
Part 7: How to Fix Software Errors Without Changing IMEI Number?
If the reason you are looking for IMEI number change is constant software errors, better ways exist. One of the best choices to resolve software errors on Android devices is to use Wondershare Dr.Fone . It stands as the world’s first one-click Android repair tool. Dr.Fone offers an effective solution to address a range of Android system issues.
Its functionality restores the Android system to its normal state. All of this happens without needing any specialized skills. Dr.Fone ensures a hassle-free repair process.
Key Features of Wondershare Dr.Fone
- Dr.Fone has a high success rate in resolving Android issues.
- This tool supports a wide array of mainstream Android models, including the latest Samsung devices.
- It has cemented its versatility and reliability in system repair for Android devices.
Steps to Repair Software Errors Without Changing IMEI Number via Dr.Fone
Here is how to repair all sorts of Android software issues using Dr.Fone. Follow the steps properly to repair all sorts of software errors in your Android device without changing the IMEI number:
Step 1: Navigate to Toolbox in Dr.Fone
Launch the Wondershare Dr.Fone software on your computer and navigate to the “Toolbox” section in the left panel. Connect the Android device requiring repair, then choose “System Repair” from the provided options. Proceed to the next screen, where you’ll select “Android” to start the repair process.

Step 2: Enter Your Nokia C32 Device’s Details
You’ll proceed to a new screen, where clicking “Start” initiates the repair process. As you move to the next window, the platform will identify the “Brand” of the Nokia C32 device. Then, choose the “Name”, “Model”, “Country”, and “Carrier”. If your device is already unlocked, select “OPEN” in the Carrier section. Afterward, mark the checkbox indicating agreement with the warning and readiness to proceed and Click “Next”.

Step 3: Put Your Nokia C32 Device into Download Mode
When prompted, follow the on-screen instructions to enter Download Mode on your Android device. The platform will automatically commence downloading the firmware, displaying its details for verification. Opt for “Fix Now” to initiate firmware installation on your Android device.

Step 4: Complete the Android Repair Process
Remember, this repair process may result in the erasure of all data. Confirm and proceed by typing in “000000.” The system repair progress can be tracked via the progress bar on the screen. Once completed, a prompt window will confirm the process’s success. If your Android device restarts correctly, click “Done” to close the tool.

Conclusion
By using the Android IMEI changer, you will neither lose your data nor need to root your device in your pursuit of changing your device’s IMEI number. However, do remember that every situation is different, and there will come a time when you need to root your device before changing your Android’s IMEI number. We advise you to use this tutorial only for legal purposes and to check the laws and regulations in your country before attempting to change your device’s IMEI number.
You will also need the IMEI number if you want to unlock your phone and use it on another carrier provider. There are a lot of SIM Unlock services out there. It is important to choose a trustworthy and workable service to unlock your phone.
The 6 Best SIM Unlock Services That Actually Work On Your Nokia C32 Device
In our ever-connected world, the need for flexibility and freedom in choosing a mobile service provider is more crucial than ever. This part explores the top 6 SIM unlock services, shedding light on their features, advantages, and why Dr.Fone - Screen Unlock (iOS) stands out as the best in the industry.
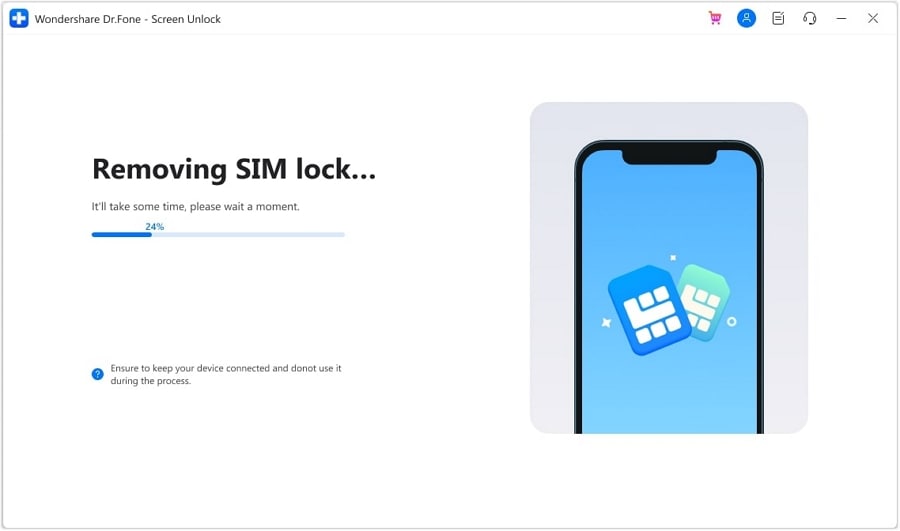
Dr.Fone - Screen Unlock (iOS) takes the top spot as the best SIM unlock service, particularly for iOS users. This comprehensive tool not only allows users to unlock their SIM but also specializes in unlocking the iPhone’s screen passcode, making it an all-in-one solution. With a user-friendly interface and a high success rate, Dr.Fone offers a seamless unlocking experience. The tool supports various iOS versions, making it compatible with a wide range of Apple devices.
Step 1. Open Dr.Fone - Screen Unlock and then choose “Remove SIM Lock”.
Step 2. Connected your tool to the computer. Complete the authorization verification process with “Start” and click on “Confirmed” to continue.
Step 3. The platform instantly identifies your iPhone, showing all details on the next screen. Confirm the information and click “Unlock Now”.
Step 4. The following screen displays a progress window for the SIM unlocking process. After completion, a message prompts you to click “Done” to conclude the process.
Here is a video for you to learn how to unlock your iPhone for use with a different carrier:
Next, follow the instructions, and you will be able to use any carriers soon. Dr.Fone will “Remove Setting” for your device at last to enable Wi-Fi connecting. Visit the iPhone SIM Unlock guide to get more!
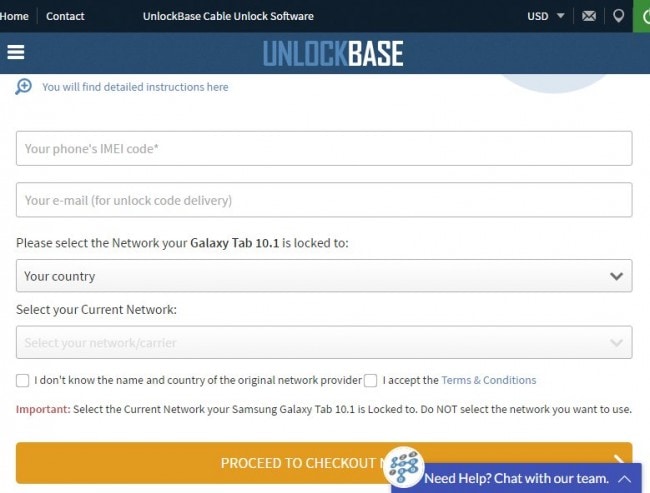
2. Unlock Base
Website URL: https://www.unlockbase.com/wholesale-phone-unlocking
This service will unlock almost all devices, both Android and iPhone. It is also very fast and reliable. But perhaps the best feature of this service is that you can be aware of just how much you will have to spend to unlock your device long before you place the order.
To use the service, simply go to the main home page and check on the table provided how long it will take for your device to be unlocked and how much you have to pay. If you are happy with both estimates. Choose to unlock from the main menu and then proceed to select your device.
Once you have selected the Nokia C32 device, enter the IMEI code, your email address, your country, and the network you are on. Then click on “Proceed to check out”. Make payment and then wait for the assigned time for the sim network unlock pin to be sent to the email address you provided.
3. iPhone IMEI
Website URL: https://iphoneimei.net/
This one is perhaps the easiest to use. It offers two services, one to check your iPhone’s IMEI and the other to use the IMEI number to unlock the iPhone.
To use the service, select the “Unlock iPhone” on the homepage. Then select the model and the network the iPhone is locked to. Click “Unlock” to
continue. You will be sent to a checkout page where you can pay the amount. The codes will be sent to the email address you provided at checkout.

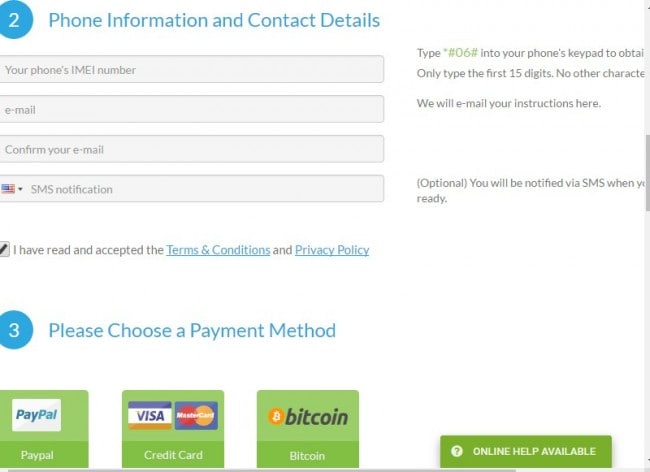
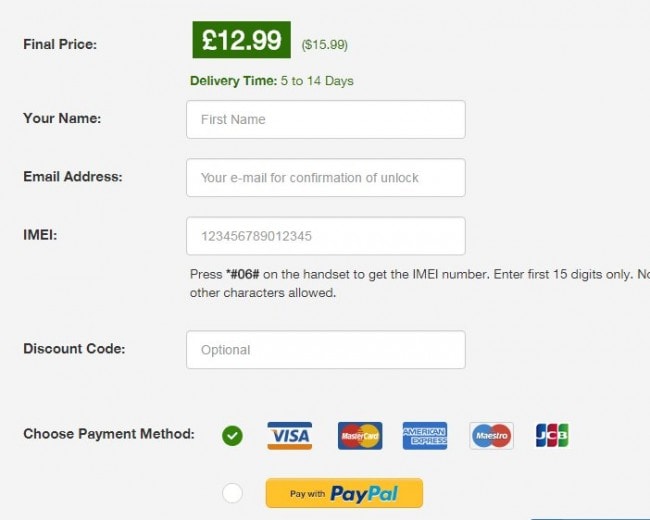
4. Doctor SIM
This is another website that can easily unlock just about any device model. It also offers an IMEI checker service as well as a lot of other helpful information about phone unlocking IMEI numbers and other issues related to devising unlocking.
To use it, click on “Unlock your Phone” in the main menu and select your device from the drop-down menu. You should see the amount you have to pay to unlock the Nokia C32 device. Click on “Unlock your phone now” to continue.
In the next window, select your country and network provider and enter the phone’s IMEI number and other information. Choose a payment method and then continue to check out. You will receive the codes at the email address you provided.
5. Mobile Unlocked
Website URL: https://www.mobileunlocked.com/
This is another service that will also provide you with phone unlock codes at a price. Just like the others, we have seen it is very easy to use and supports all devices.
To use it, select the “Unlock” option from the main menu and then choose your device’s model from the drop-down menu. Next, provide your device’s details and then proceed to pay for the service and provide your name, email address, and IMEI number.
Once you click on “unlock now” all you have to do is wait the stipulated time for the codes to be sent to you.
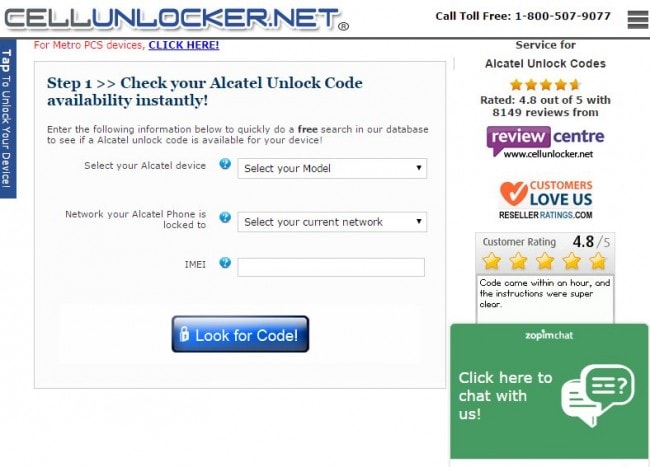
6. Cell Unlocker
Website URL: http://www.cellunlocker.net/
This service will also offer to unlock services at a price. The service unlocks all devices, including the iPhone, and they pride themselves on providing excellent service in the shortest period. They also offer a 100% guarantee that they offer this service at the lowest price in the market.
To use this service, select “Unlock your Device” from the main menu and then select your device model from the list provided. There is a lot of information to read through, but when you scroll down a bit, you should be able to enter the Nokia C32 device’s information and then click on “look for code”
You will be directed to a payment page where you can make your payment. The codes will be sent to you in a few days.
Also read:
- In 2024, Easily Unlock Your Oppo Reno 10 5G Device SIM
- Android Unlock Code Sim Unlock Your Vivo V27 Pro Phone and Remove Locked Screen
- In 2024, Sim Unlock Samsung Galaxy M54 5G Phones without Code 2 Ways to Remove Android Sim Lock
- How Do I SIM Unlock My iPhone 13 Pro?
- How to Unlock T-Mobile iPhone 12 mini online without SIM Card?
- The Ultimate Guide to Unlocking Your Apple iPhone 13 Pro on MetroPCS
- Top 10 Samsung Galaxy A54 5G Android SIM Unlock APK
- In 2024, Tutorial to Change Samsung Galaxy A34 5G IMEI without Root A Comprehensive Guide
- In 2024, Network Locked SIM Card Inserted On Your Motorola Razr 40 Ultra Phone? Unlock It Now
- How To Change Your SIM PIN Code on Your Realme V30T Phone
- Top IMEI Unlokers for Your Nokia XR21 Phone
- In 2024, The Best Android SIM Unlock Code Generators Unlock Your Motorola Moto G34 5G Phone Hassle-Free
- In 2024, 3 Ways to Unlock Your iPhone 14 Pro Max for Free
- How To Change Your SIM PIN Code on Your Vivo X100 Phone
- In 2024, How to Unlock AT&T iPhone 12 Pro with 3 Methods
- Unlock Your Apple iPhone 7 in Minutes with ICCID Code Everything You Need to Know
- Top IMEI Unlokers for Your Lava Yuva 2 Phone
- In 2024, How To Check if Your Nokia Is Unlocked
- How To Change Your SIM PIN Code on Your Xiaomi Redmi Note 12T Pro Phone
- In 2024, How to Unlock SIM Card on Lava Blaze Curve 5G online without jailbreak
- In 2024, How To Change Your SIM PIN Code on Your Nokia G42 5G Phone
- In 2024, The Best Android Unlock Software For Oppo A58 4G Device Top 5 Picks to Remove Android Locks
- What Is a SIM Network Unlock PIN? Get Your Meizu 21 Pro Phone Network-Ready
- In 2024, How to Unlock SIM Card on Apple iPhone 13 Pro online without jailbreak
- How to Fix Xiaomi Redmi K70 Pro Find My Friends No Location Found? | Dr.fone
- A Step-by-Step Guide on Using ADB and Fastboot to Remove FRP Lock on your Samsung Galaxy F34 5G
- How To Transfer Data From iPhone 13 Pro To Other iPhone 15 Pro Max devices? | Dr.fone
- Fix the Error of Unfortunately the Process.com.android.phone Has Stopped on Huawei Nova Y91 | Dr.fone
- In 2024, How to Track Samsung Galaxy A25 5G Location without Installing Software? | Dr.fone
- Loop It! Best Free GIF Makers for Endless Animation
- How To Change Xiaomi Redmi Note 13 Pro+ 5G Lock Screen Password?
- New In 2024, Top Online Video Background Changers Transform Your Videos with Ease
- New 2024 Approved Best WhatsApp Status Video Generator Tools
- Does G54 5G support MOV videos ?
- New In 2024, 6 Tips for Your First Facebook Ads
- Can you play MP4 on Xiaomi Redmi Note 12 4G?
- 5 Ways to Reset OnePlus 11R Without Volume Buttons | Dr.fone
- In 2024, Hacks to do pokemon go trainer battles For Motorola Moto G14 | Dr.fone
- In 2024, How to Track Vivo Y27 5G Location without Installing Software? | Dr.fone
- Updated Is It That Easy to Make My Own Animated Character for 2024
- 5 Easy Ways to Change Location on YouTube TV On Realme 12 Pro 5G | Dr.fone
- Title: What Does Enter PUK Code Mean And Why Did The Sim Get PUK Blocked On Nokia C32 Device
- Author: Abner
- Created at : 2024-04-30 18:23:48
- Updated at : 2024-05-01 18:23:48
- Link: https://sim-unlock.techidaily.com/what-does-enter-puk-code-mean-and-why-did-the-sim-get-puk-blocked-on-nokia-c32-device-by-drfone-android/
- License: This work is licensed under CC BY-NC-SA 4.0.
