
Tutorial to Change Vivo Y17s IMEI without Root A Comprehensive Guide
Tutorial to Change Vivo Y17s IMEI without Root: A Comprehensive Guide
As an Android device user, you may have come across a situation where you need to change your device IMEI number. The International Mobile Equipment Identity (IMEI) is a unique 15-digit number assigned to every mobile device, such as smartphones and tablets. This number serves as an identifier, helping to distinguish your device from millions of others. One of the main reasons people want to change their Android IMEI number is to unblock a device that has been blacklisted by their network provider. Other reasons include accessing certain network features and services or maintaining anonymity.
Changing your Android IMEI without root access may seem like a daunting task, but this comprehensive guide will walk you through the process step-by-step. Before proceeding, please note that altering your device’s IMEI number can be illegal in some countries, and may void your warranty. Proceed with caution and at your own risk. Get to know how to change IMEI number now!
Part 1: What is IMEI and Why People Change The IMEI Number
The International Mobile Equipment Identity (IMEI) is a unique identifier for every mobile device. It allows network providers and manufacturers to track and block devices if they are reported as lost or stolen. Changing your device’s IMEI can help to unblock a blacklisted device, access certain network features and services, or maintain anonymity. However, be aware that altering your IMEI number is illegal in some countries and may void your warranty.

There are several uses of the IMEI number
- As the use of mobile devices increases, the statistics of stolen and lost devices have been increasing as well. Users can block stolen or lost devices for further usage if they know their IMEI number. All users need to call their network carrier and report that the Vivo Y17s device is stolen or lost. The carrier can block the specific device from running on their network and notify other carriers.
- The 15-digit IMEI number indicates the origin and model of the Vivo Y17s device. The first eight digits indicate the Vivo Y17s device’s origin and its model while the last six digits identify the Vivo Y17s device’s manufacturer.
- If you subscribe to a mobile tracking service, you can use the IMEI number to track the Vivo Y17s device—even if it uses a different SIM card.
Pros and Cons of Changing Android IMEI
Like many other things out there, changing Android IMEI has both advantages and disadvantages. Here are some of them:
Advantages
- Make your Android untraceable. By constantly changing your IMEI, you will throw off the tracks of people using it to stalk you!
- Fix any invalid IMEI-related issues such as lost or invalid IMEI numbers. Once you change your IMEI, your Android device with the same benefits and features.
- Obtaining a completely new device ID.
- Changing the IMEI number to one that indicates it is a newer model, you will be able to enjoy new OS updates by resetting, repairing, and updating your Android device.
- Have you ever yearned for that cheap BlackBerry plan your network carrier keeps on promoting? The 15-digit IMEI indicates the origin and model of your device. Therefore, by changing your Android’s IMEI number to that of a BlackBerry’s, you will be able to subscribe to a cheaper mobile plan.
Disadvantages
- Before we begin, we need to make it clear that the process of changing IMEI without root can be illegal in some countries. We advise you to check the laws and regulations in your country before attempting to change your device’s IMEI number. As far as we know, it is legal in Africa and Asia, and illegal in Europe.
- The IMEI number is hardcoded into your device. Therefore, changing your device’s IMEI number may void your device warranty and cause other issues such as network problems and software instability.
- Legally, you have forfeited your ownership of your mobile device. When you purchase your device, the seller will jot down the original IMEI number on your receipt. So if you changed your IMEI and lost it, you may not be able to claim it. This is because authorities cannot see if it is truly yours. After all, the IMEI numbers no longer correlate with each other.
Part 2: How to Find the IMEI on an Android? (5 Ways)
It is essential to know your Android device’s IMEI for various reasons, such as registering the Vivo Y17s device, reporting it as stolen or lost, checking warranty status, or verifying its authenticity. In this part, we will walk you through the various methods on how to find the IMEI on your Android device.
Parental Control Software
### Method 1: Locate IMEI through the Settings AppOne of the easiest ways to find the IMEI number on your Android device is through the Settings app. Follow these simple steps:

- Step 1: Open the “Settings” app on your Android device.
- Step 2: Scroll down and tap on “About phone” or “About device”.
- Step 3: Tap on “Status” or “IMEI information”.
- Step 4: You will see your IMEI number displayed on the screen. Note this down or take a screenshot for reference.

Method 2: Use the Dialer App
Another quick method to find the IMEI number is by using the dialer app on your Android smartphone. Here’s how:
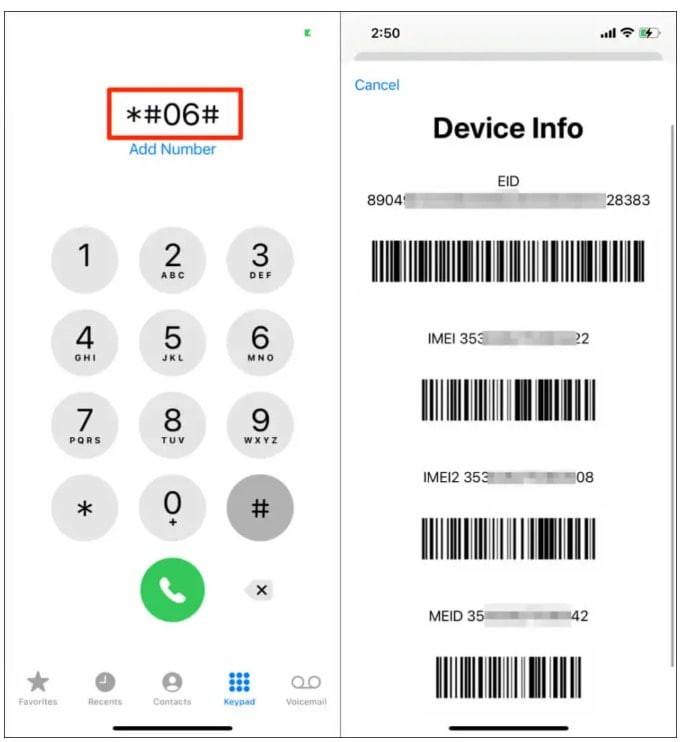
- Step 1: Open the “Phone” app or “Dialer” app on your Android device.
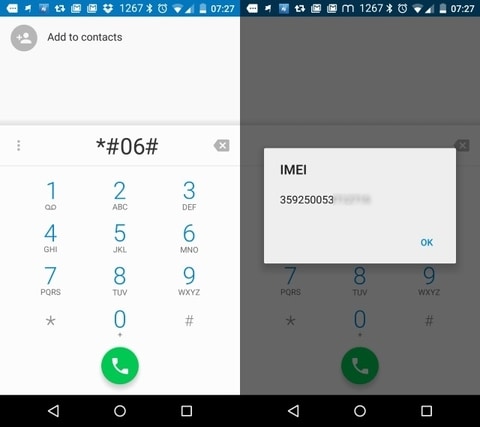
- Step 2: Dial *#06# on the keypad.
- Step 3: The IMEI number will be displayed on the screen. Note it down or take a screenshot for reference.
Method 3: Check the Vivo Y17s device Packaging or Receipt
If you still have the original packaging or receipt for your Android device, you may find the IMEI number printed on it. Look for a label or sticker on the box that contains the Vivo Y17s device’s details, including the IMEI number.
Method 4: Find IMEI on a Removable Battery (for older devices)
For older Android devices with removable batteries, you can find the IMEI number printed on a sticker underneath the battery. To locate it, follow these steps:

- Step 1: Power off your Android device.
- Step 2: Remove the back cover and take out the battery.
- Step 3: Look for a sticker or printed text with the IMEI number.
- Step 4: Note it down or take a photo for reference.
Method 5: Check the SIM Card Tray
Some Android devices have the IMEI number printed on the SIM card tray. To check if your device has this feature:

- Step 1: Power off your Android device.
- Step 2: Use the SIM card removal tool (or a paperclip) to eject the SIM card tray.
- Step 3: Look for the IMEI number printed on the tray.
- Step 4: Note it down or take a photo for reference.
Part 3: Does IMEI Change With SIM Card?
No, swapping or changing the SIM card does not alter the IMEI (International Mobile Equipment Identity). The IMEI persists unchanged throughout the Vivo Y17s device’s lifetime, functioning as a distinctive identifier solely for that particular device.
The IMEI is a 15-digit code assigned to each mobile device. It’s separate from the SIM card, which stores information related to the subscriber and the carrier network. The SIM card contains data specific to the subscriber. This includes contacts, text messages, and network-related information. But it does not alter or affect the IMEI of the Vivo Y17s device.
The IMEI remains the same even if you change SIM cards or switch between different carriers. It’s essentially a static identifier tied to the Vivo Y17s device’s hardware. It is used by mobile networks and authorities to identify and track devices on the network.
Part 4: Does IMEI Change After Factory Reset?
No, performing a factory reset on your mobile device does not change its IMEI (International Mobile Equipment Identity). The IMEI is a unique identifier assigned to the hardware of the Vivo Y17s device. It remains constant throughout the life of the Vivo Y17s device, irrespective of any software changes or resets.
A factory reset wipes the data and settings on your device, returning it to its original factory state. This process erases user-installed apps, personal data, and settings. But it doesn’t affect the Vivo Y17s device’s hardware identification, including the IMEI.
The IMEI is embedded into the hardware of the Vivo Y17s device. It is typically printed on the Vivo Y17s device’s packaging or can be found by dialing *#06# on the phone’s keypad. It’s a crucial identifier for mobile networks, and authorities use it to uniquely identify and track devices across networks. It remains unchanged even after a factory reset.
Part 5: Requirements for Changing Android IMEI without Root
Before you begin the process of changing your Android IMEI without root, there are a few things you will need:
- A compatible Android device: The methods detailed in this guide are specifically for MediaTek (MTK) devices. Ensure that your device has a MediaTek chipset before proceeding..
- A new IMEI number: You’ll need a valid IMEI number to replace the current one on your device. You can either generate one using an IMEI generator tool or use the IMEI number of an old, unused device..
- A stable internet connection: Some of the methods require you to download apps and modules, so make sure you have a stable Wi-Fi connection.
- Back up your Android phone: Before making any changes to your device, it is always recommended to backup your data. This will help you to avoid any data loss in case anything goes wrong during the process. You can back up your device data using Google Backup or a local backup software like Wondershare Dr.Fone .
Wondershare Dr.Fone is a tool that helps you keep your important data safe. It can back up all the important information on your Android phone or tablet, like photos, music, videos, contacts, and more and is compatible with over 8000 Android devices. The backup process is easy and only takes a few clicks. You can also restore your backup to any device you want, and choose which data you want to restore. This is a great way to make sure you never lose your important information!
Part 6: How to Change Android IMEI Number without Root?
There are several methods to change your Android IMEI without root access. This tutorial will cover three popular methods: using MobileUncle Tools, Xposed Installer and IMEI Changer Pro, and MTK Engineering Mode.
1. Using Xposed Installer and IMEI Changer Pro

This IMEI changer Android app is built to allow a user to change the series of numbers that make up their devices’ IMEI identification. Randomized IMEI numbers will be generated every time the app is used. However, users can type in a new IMEI number in the text field if they have a specific number in mind. This no-ads app is really simple to use–to complete the change, a user will only need to click the “Apply” button and restart their devices. Its interface is also simple enough for easy navigation.
This method involves using the Xposed Installer app to install the IMEI Changer Pro module. Follow the steps below:
- Step 1: Download and install the Xposed Installer app from a trusted source.
- Step 2: Open the app and go to the “Framework” section. Tap on “Install/Update” to install the Xposed Framework on your device. Reboot your device once the installation is complete.
- Step 3: Download and install the IMEI Changer Pro app from a trusted source.
- Step 4: Launch the Xposed Installer app again, and go to the “Modules” section. Enable the IMEI Changer Pro module by checking the box next to it.
- Step 5: Reboot your device for the changes to take effect.
- Step 6: Open the IMEI Changer Pro app and enter your new IMEI number in the provided field.
- Step 7: Tap on the “Apply” button, and then restart your device. Your new IMEI number should now be active.
2. Using MobileUncle Tools

MobileUncle Tools is a simple Android application that can retrieve your Android device’s information, back up IMEI, change its IMEI, and search for its recovery files. It will also be able to assist you with any rebooting needs and many more!
Follow these steps to change your IMEI using MobileUncle Tools:
- Step 1: Download the MobileUncle Tools app from a trusted source and install it on your device.
- Step 2: Open the app and grant the necessary permissions.
- Step 3: From the main menu, select “Engineer Mode”.
- Step 4: In the Engineer Mode, select “MTK”.
- Step 5: Scroll down and tap on “Connectivity”.
- Step 6: Next, tap on “CDS Information”.
- Step 7: Select “Radio Information”.
- Step 8: You will see two options: Phone 1 and Phone 2. Choose the one corresponding to the SIM slot for which you want to change the IMEI.
- Step 9: In the input field, type “AT+EGMR=1,7,” followed by your new IMEI number within double quotes. For example: AT+EGMR=1,7,”123456789012345”.
- Step 10: Tap on the “Send AT Command” button. You should see a message confirming that the command has been sent successfully.
- Step 11: Restart your device. The new IMEI number should now be active.
3. Using MTK Engineering Mode
![]()
MTK Engineering Mode is another app designed for MediaTek devices that allows users to access hidden settings and options. It was specifically made for Taiwanese device manufacturers such as Tecno, Infinix, Elephone, Oppo, Chuwi, etc. While not fully recommended, reports have been that it works with Android devices made by non-Taiwanese manufacturers. Its clean interface makes navigating the app seamlessly.
Follow these steps to change your IMEI using MTK Engineering Mode:

- Step 1: Download and install the MTK Engineering Mode app from a trusted source.
- Step 2: Launch the app and select “MTK Settings”.
- Step 3: Scroll down and tap on “Connectivity”.
- Step 4: Next, tap on “CDS Information”.
- Step 5: Select “Radio Information”.
- Step 6: Choose either Phone 1 or Phone 2, depending on the SIM slot for which you want to change the IMEI.
- Step 7: Enter the following command in the input field: AT+EGMR=1,7,”Your_New_IMEI_Number”.
- Step 8: Tap on the “Send AT Command” button. A confirmation message should appear.
- Step 9: Restart your device, and the new IMEI number should be active.
Part 7: How to Fix Software Errors Without Changing IMEI Number?
If the reason you are looking for IMEI number change is constant software errors, better ways exist. One of the best choices to resolve software errors on Android devices is to use Wondershare Dr.Fone . It stands as the world’s first one-click Android repair tool. Dr.Fone offers an effective solution to address a range of Android system issues.
Its functionality restores the Android system to its normal state. All of this happens without needing any specialized skills. Dr.Fone ensures a hassle-free repair process.
Key Features of Wondershare Dr.Fone
- Dr.Fone has a high success rate in resolving Android issues.
- This tool supports a wide array of mainstream Android models, including the latest Samsung devices.
- It has cemented its versatility and reliability in system repair for Android devices.
Steps to Repair Software Errors Without Changing IMEI Number via Dr.Fone
Here is how to repair all sorts of Android software issues using Dr.Fone. Follow the steps properly to repair all sorts of software errors in your Android device without changing the IMEI number:
Step 1: Navigate to Toolbox in Dr.Fone
Launch the Wondershare Dr.Fone software on your computer and navigate to the “Toolbox” section in the left panel. Connect the Android device requiring repair, then choose “System Repair” from the provided options. Proceed to the next screen, where you’ll select “Android” to start the repair process.

Step 2: Enter Your Vivo Y17s Device’s Details
You’ll proceed to a new screen, where clicking “Start” initiates the repair process. As you move to the next window, the platform will identify the “Brand” of the Vivo Y17s device. Then, choose the “Name”, “Model”, “Country”, and “Carrier”. If your device is already unlocked, select “OPEN” in the Carrier section. Afterward, mark the checkbox indicating agreement with the warning and readiness to proceed and Click “Next”.


Step 3: Put Your Vivo Y17s Device into Download Mode
When prompted, follow the on-screen instructions to enter Download Mode on your Android device. The platform will automatically commence downloading the firmware, displaying its details for verification. Opt for “Fix Now” to initiate firmware installation on your Android device.

Step 4: Complete the Android Repair Process
Remember, this repair process may result in the erasure of all data. Confirm and proceed by typing in “000000.” The system repair progress can be tracked via the progress bar on the screen. Once completed, a prompt window will confirm the process’s success. If your Android device restarts correctly, click “Done” to close the tool.


Conclusion
By using the Android IMEI changer, you will neither lose your data nor need to root your device in your pursuit of changing your device’s IMEI number. However, do remember that every situation is different, and there will come a time when you need to root your device before changing your Android’s IMEI number. We advise you to use this tutorial only for legal purposes and to check the laws and regulations in your country before attempting to change your device’s IMEI number.
You will also need the IMEI number if you want to unlock your phone and use it on another carrier provider. There are a lot of SIM Unlock services out there. It is important to choose a trustworthy and workable service to unlock your phone.
How To Unlock SIM Cards Of Vivo Y17s Without PUK Codes
Unintentionally locking your SIM card with an incorrect PIN is a common occurrence. It’s frustrating because it prevents you from accessing your essential mobile services. Thankfully, Personal Unblocking Key (PUK) codes offer a way to unlock it. However, what happens if you lose them?
This comprehensive guide explores how to unlock SIM cards without the PUK Codes. Whether you’re a techie or a tech noob, you’ll be sure to find easy solutions in this article. From directly contacting your mobile carrier to utilizing alternative unlocking techniques, you will see clear and concise instructions that empower you to navigate this technical hurdle.
Part 1: Official Ways To Unlock SIM Cards With a Lost PUK Code
Locking your SIM card with a forgotten PIN can be a frustrating experience, especially when your trusty PUK code seems to have vanished. While unauthorized methods exist to unlock your SIM card, venturing down that path can lead to complications and potential security risks. This guide prioritizes safe and official methods, ensuring a smooth and secure unlocking process with the help of your mobile carrier.
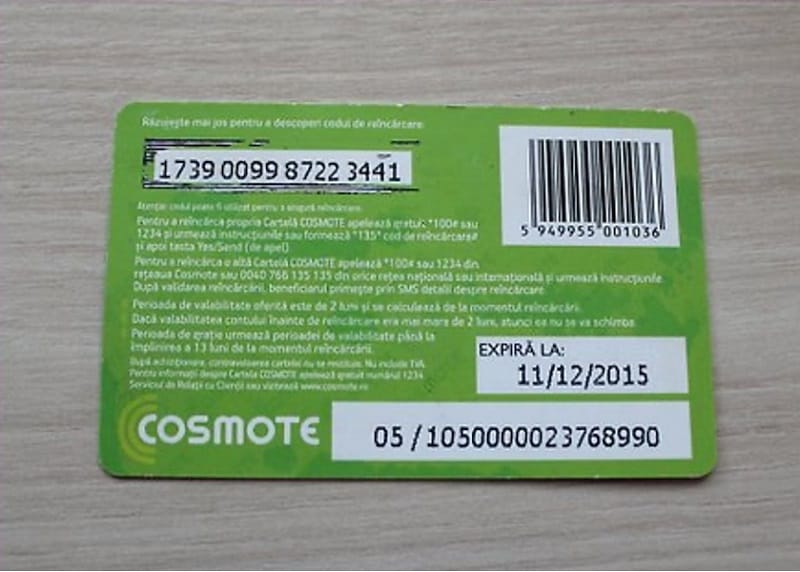
Firstly, remember that the PUK code typically arrives alongside your SIM card in its original packaging. Keeping this information safe alongside your other crucial documents is always helpful. However, if memory betrays you and the packaging is nowhere to be found, this part will show you how to unlock SIM cards without PUK codes with the help of your carrier.
### Method 1: Contacting Your Carrier’s Customer ServiceThe most straightforward approach is contacting your mobile carrier’s customer service department directly. Their representatives are trained to assist in such situations and can verify your identity before providing the PUK code. Be prepared to answer security questions and provide relevant account details to ensure a smooth process.

Here’s what you’ll need:
- Ready your information. Prepare your account number, phone number, and any other relevant details your carrier might require for verification.
- Find the best contact option for you. Most carriers offer multiple options like phone calls, online chat, or visiting a physical store. Opt for the method that best suits your preference and availability.
- Prepare a written report of what happened. Clearly state that you’ve locked your SIM card by entering an incorrect PIN and have lost your PUK code.
- **Verify your identity.**Answer the security questions or provide the requested account details to confirm that you’re the authorized user.
- Receive your PUK code/new SIM card. Once verified, the representative will provide you with your PUK code. Be sure to write it down in a secure location for future reference. They might offer you a replaced SIM card if no PUK codes exist.
- **Unlock your SIM card.**Enter the PUK code on your phone following the specific instructions provided by your carrier. This typically involves entering the PUK code followed by a new PIN.
Method 2: Retrieving the PUK Code Through Your Carrier’s Website
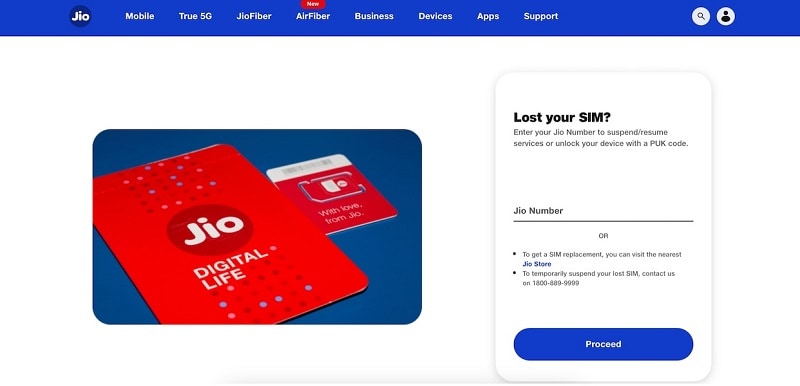
Many mobile carriers offer self-service options on their websites, allowing you to manage your account and access information independently. If your carrier provides this functionality, you can retrieve your PUK code online without contacting customer service. This way, you’ll learn how to unlock SIM cards without PUK numbers.
Here’s how it might work:
- Step 1: Navigate to the secure section of your account using your login credentials. For example, this is what you can see from the JIO website:
- Step 2: Different carriers have varying website layouts, so refer to their specific instructions or search features to find the dedicated section for retrieving PUK codes.
- Step 3: Similar to contacting customer service, you might need to verify your account ownership through security questions or other verification methods.
- Step 4: Once verified, your PUK code should be displayed on the screen or sent to your registered email address.
Remember, these steps are general guidelines, and specific procedures may vary depending on your carrier. Consult your carrier’s website or contact customer service for the most accurate and up-to-date information.
By following these official routes, you can safely and securely bypass the PUK code hurdle and regain access to your vital mobile services. Stay tuned for Part 2, where you’ll explore alternative unlocking methods for those who prefer a different approach.
Part 2: Unlocking SIM Cards With the Help of a Third-Party Tool
While official methods through your carrier are always recommended, some situations might arise where you’ll need to learn how to unlock SIM cards without PUK codes. Third-party tools like Wondershare Dr.Fone offer an alternative approach in such cases. This section explores this option, emphasizing transparency and responsible usage.
Disclaimer: Before proceeding, be aware that utilizing third-party tools might void your device’s warranty and potentially introduce security risks. Choose trusted, reputable applications with clear user guides and a history of responsible operation. Proceed with caution and at your discretion.
Introducing Wondershare Dr.Fone
Dr.Fone stands out as a trusted and versatile tool for SIM unlocking. It surpasses mere unlocking functionality, offering a comprehensive suite of features like data repair, system repair, screen unlock, and more, catering to various mobile needs under one software. With over 50 million active users, Dr.Fone boasts a solid reputation for reliability and effectiveness.
Unlocking Your SIM With Dr.Fone
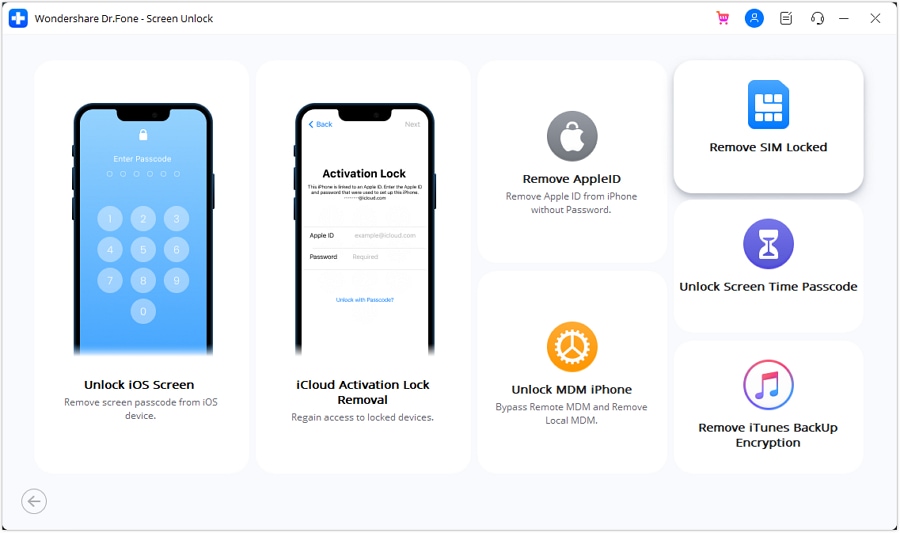
Dr.Fone’s SIM unlocking capability resides within its “Screen Unlock” feature. This powerful toolset caters to bypassing various locks, including Apple ID, Google accounts, and more. Remember, this feature is intended for legitimate use only, respecting device ownership and security protocols. Either way, it’s a great way to know how to unlock SIM cards with iPhones without PUK codes.
To use this powerful feature, follow the steps below:
Step 1: Grab Dr.Fone from its official website, install it, and fire it up.
Step 2: Head to Toolbox > Screen Unlock > iOS (remember, only for iOS devices).

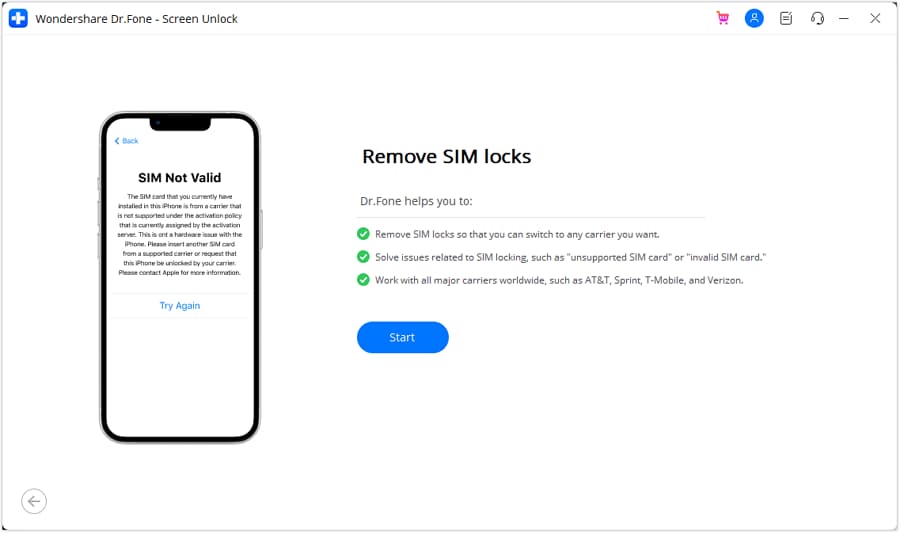
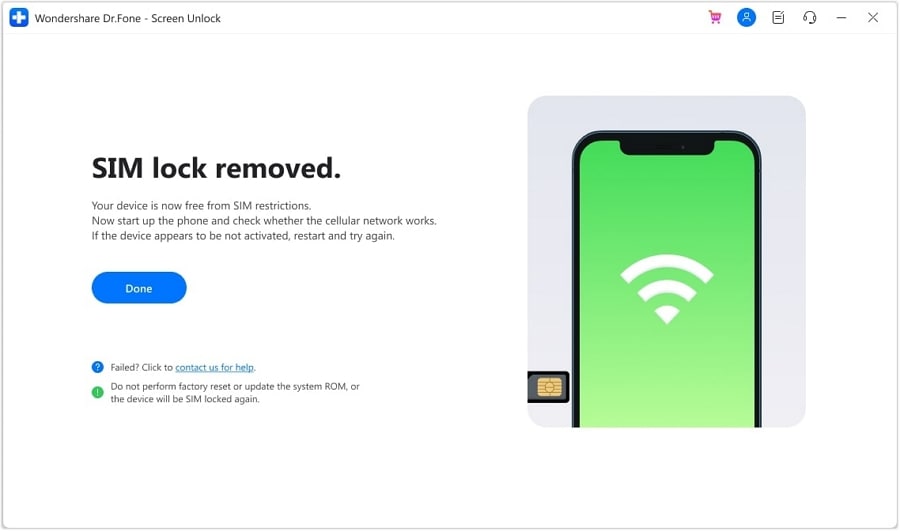
- Step 3: Click Remove SIM Locked to start the unlocking process.
- Step 4: Click Start when you see this page.
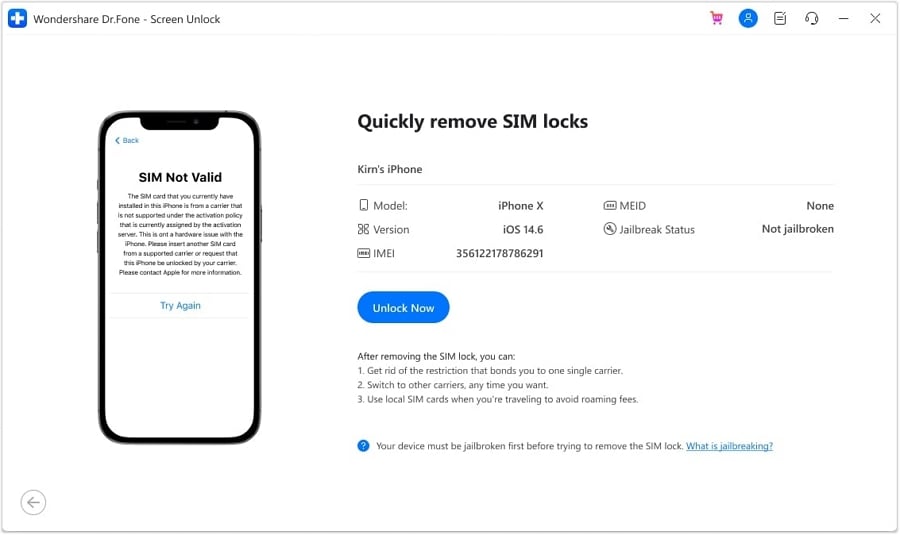
- Step 5: Verify your device details and hit Unlock Now.
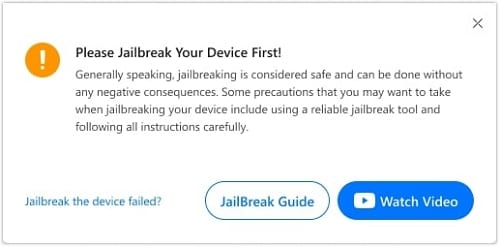
- Step 6: Be aware that jailbreaking your iPhone is necessary. Use the provided JailBreak Guide or Watch Video if needed.
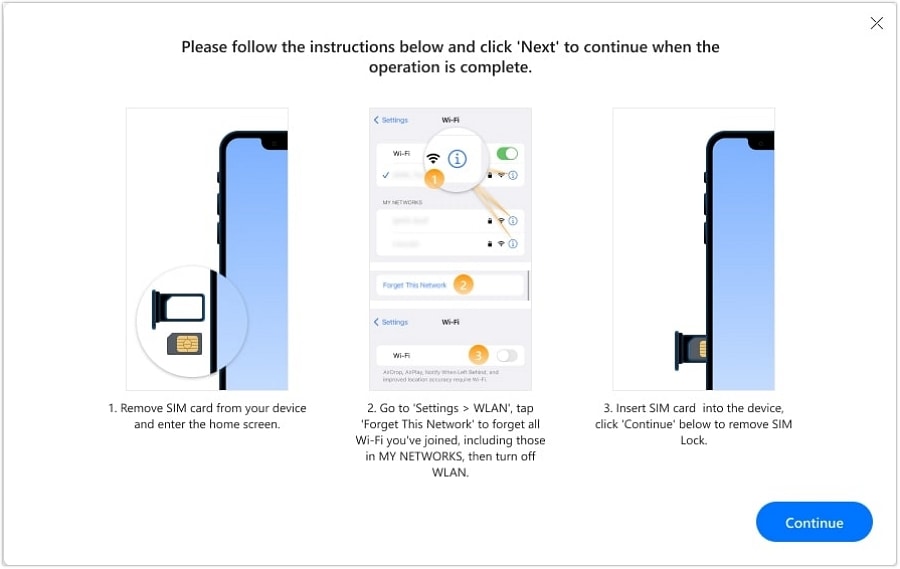
- Step 7: Carefully follow the on-screen instructions to ensure a smooth process. Then, click Continue.
- Step 8: Once finished, click Done to enjoy your unlocked SIM card!
Conclusion
Navigating SIM card lockouts can be stressful, but remember, you have options! While official routes through your carrier are always recommended, tools like Wondershare Dr.Fone teach how to unlock SIM cards without PUK codes. Remember, responsible usage is key when choosing third-party tools. If you opt for this route, Dr.Fone stands out for its reliability and extensive features beyond SIM unlocking.
So, breathe easy, explore your options, and choose the path best suits your situation. With the right approach, you’ll use your unlocked SIM card quickly! And if your phone needs some help, remember that Dr.Fone is there to help you unlock not only your SIM but also a world of possibilities for your mobile companion.
Easily Unlock Your Vivo Y17s Device SIM
Is your Android phone SIM locked? Having an unlocked device can have its benefits but most of the time most people don’t even know whether their device is SIM locked or not. In this article we are going to address this issue. We are going to begin by helping you find out whether your phone is locked or not and if it is, how you can sim unlock the Vivo Y17s device and enjoy the benefits of an unlocked phone.
Part 1: How to Know if your Android is SIM Locked
It is important to note that not all phones are SIM locked. You can find out if yours is by checking the Vivo Y17s device’s documentation. If you see the words “unlocked” on the initial receipt then you know that the Vivo Y17s device is not SIM locked.
Another easy way to find out is to ask your carrier if the Vivo Y17s device is locked on to their network. You can also just try inserting another carrier’s SIM into your device. If it doesn’t work, you will know that the Vivo Y17s device is SIM locked.
If you bought your device from a third party re-seller such as Amazon you are more likely to be in possession of an unlocked device.
## Part 2: How to SIM Unlock your Android DeviceIf you find that your SIM is locked, here’s a few things you can do to unlock the Vivo Y17s device.
Avoid all of the apps on the Google Play Store that promise to unlock your device, most of them don’t work and may even harbour a lot of Trojans and malware that will cause further problems for you and your device.
There are safe and very legal ways to unlock your device. Just try one of the following.
Ask your Carrier to Unlock your Device
This is the best option when you want to safely unlock your device. By February 2015, American cell phone owners got the option to request their carriers to unlock their device for them. Before that the law didn’t allow for carriers to unlock SIM cards in the United States. This unpopular law was reversed following a similar move by the European Union in 2013. The same law also requires that the carriers inform customers every month whether their device is eligible for unlocking.
If your device is eligible for unlocking, all you need to do is contact the carrier provide and request for the sim network unlock pin . But if your Smartphone was bought on a contract, you may need to pay a termination fee to break the contract of you want to unlock the Vivo Y17s device before the contact term expires. For Smartphones that are not on contract, you have to wait 12 months from the date of purchase and ensure that your bill is paid before the carrier can give you the unlock code.
How to Unlock your Android Phone
To begin with, you need to confirm your IMEI number. Dial *#06# on your device and the IMEI number will appear on the screen. Copy this number to a secure location or wrote it down somewhere.
The next step is to find a reputable service that will unlock your Android device for you. This is action you should take only if you are absolutely desperate and your carrier can’t unlock your device for you. This is because many of these sites are unregulated and many of them are not reliable.
You should also know that many of them will charge a certain amount for your service. You can try https://www.safeunlockcode.com/ which is one of the more reputable ones we have found.
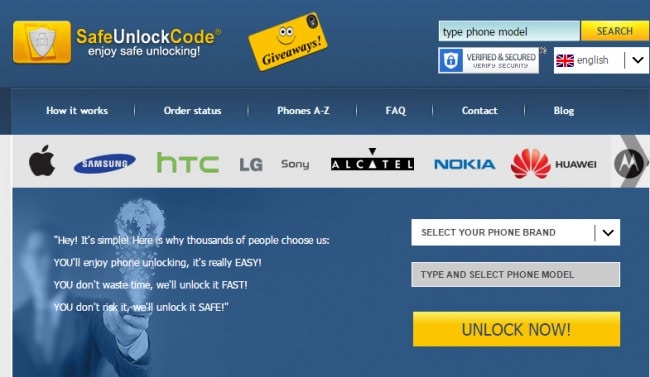
You will need to enter the IMEI number as part of the information you need to provide before they can unlock your device.
Part 3: Troubleshooting Android SIM Unlock
There are lots of issues you may face when you try to unlock your device. The following are just some of the troubleshooting actions you can take if you encounter these problems.
Unlocking Code Fails to work
If you asked your carrier to unlock your device for you, chances are that they sent you a code. If the unlocking code fails to work double check that the IMEI number you used is the correct one and ensure that you purchased that device from that carrier and then try again.
Samsung Device Freezes during unlocking
If your device freezes during the unlocking process it typically means that you entered wrong unlocking code too many times. In this case you need to contact the carrier for a Master Code.
My LG device won’t unlock
There are some LG models that cannot be unlocked. These models include LG U300, LG U310, LG U8180, LG U8330, LG U8120, LG U8360, LG U8380, LGU880, and LG U890. If your device is one of these it can’t be unlocked by your carrier. You may need to look into other ways of unlocking your device.
- Title: Tutorial to Change Vivo Y17s IMEI without Root A Comprehensive Guide
- Author: Abner
- Created at : 2024-07-16 16:13:58
- Updated at : 2024-07-17 16:13:58
- Link: https://sim-unlock.techidaily.com/tutorial-to-change-vivo-y17s-imei-without-root-a-comprehensive-guide-by-drfone-android/
- License: This work is licensed under CC BY-NC-SA 4.0.