
:max_bytes(150000):strip_icc():format(webp)/photo-editor-working-on-computer-at-desk-in-office-946928370-5b85791746e0fb0025b40d84.jpg)
In 2024, Tutorial to Change Vivo Y17s IMEI without Root A Comprehensive Guide
Tutorial to Change Vivo Y17s IMEI without Root: A Comprehensive Guide
As an Android device user, you may have come across a situation where you need to change your device IMEI number. The International Mobile Equipment Identity (IMEI) is a unique 15-digit number assigned to every mobile device, such as smartphones and tablets. This number serves as an identifier, helping to distinguish your device from millions of others. One of the main reasons people want to change their Android IMEI number is to unblock a device that has been blacklisted by their network provider. Other reasons include accessing certain network features and services or maintaining anonymity.
Changing your Android IMEI without root access may seem like a daunting task, but this comprehensive guide will walk you through the process step-by-step. Before proceeding, please note that altering your device’s IMEI number can be illegal in some countries, and may void your warranty. Proceed with caution and at your own risk. Get to know how to change IMEI number now!
Part 1: What is IMEI and Why People Change The IMEI Number
The International Mobile Equipment Identity (IMEI) is a unique identifier for every mobile device. It allows network providers and manufacturers to track and block devices if they are reported as lost or stolen. Changing your device’s IMEI can help to unblock a blacklisted device, access certain network features and services, or maintain anonymity. However, be aware that altering your IMEI number is illegal in some countries and may void your warranty.

There are several uses of the IMEI number
- As the use of mobile devices increases, the statistics of stolen and lost devices have been increasing as well. Users can block stolen or lost devices for further usage if they know their IMEI number. All users need to call their network carrier and report that the Vivo Y17s device is stolen or lost. The carrier can block the specific device from running on their network and notify other carriers.
- The 15-digit IMEI number indicates the origin and model of the Vivo Y17s device. The first eight digits indicate the Vivo Y17s device’s origin and its model while the last six digits identify the Vivo Y17s device’s manufacturer.
- If you subscribe to a mobile tracking service, you can use the IMEI number to track the Vivo Y17s device—even if it uses a different SIM card.
Pros and Cons of Changing Android IMEI
Like many other things out there, changing Android IMEI has both advantages and disadvantages. Here are some of them:
Advantages
- Make your Android untraceable. By constantly changing your IMEI, you will throw off the tracks of people using it to stalk you!
- Fix any invalid IMEI-related issues such as lost or invalid IMEI numbers. Once you change your IMEI, your Android device with the same benefits and features.
- Obtaining a completely new device ID.
- Changing the IMEI number to one that indicates it is a newer model, you will be able to enjoy new OS updates by resetting, repairing, and updating your Android device.
- Have you ever yearned for that cheap BlackBerry plan your network carrier keeps on promoting? The 15-digit IMEI indicates the origin and model of your device. Therefore, by changing your Android’s IMEI number to that of a BlackBerry’s, you will be able to subscribe to a cheaper mobile plan.
Disadvantages
- Before we begin, we need to make it clear that the process of changing IMEI without root can be illegal in some countries. We advise you to check the laws and regulations in your country before attempting to change your device’s IMEI number. As far as we know, it is legal in Africa and Asia, and illegal in Europe.
- The IMEI number is hardcoded into your device. Therefore, changing your device’s IMEI number may void your device warranty and cause other issues such as network problems and software instability.
- Legally, you have forfeited your ownership of your mobile device. When you purchase your device, the seller will jot down the original IMEI number on your receipt. So if you changed your IMEI and lost it, you may not be able to claim it. This is because authorities cannot see if it is truly yours. After all, the IMEI numbers no longer correlate with each other.
Part 2: How to Find the IMEI on an Android? (5 Ways)
It is essential to know your Android device’s IMEI for various reasons, such as registering the Vivo Y17s device, reporting it as stolen or lost, checking warranty status, or verifying its authenticity. In this part, we will walk you through the various methods on how to find the IMEI on your Android device.
Method 1: Locate IMEI through the Settings App
One of the easiest ways to find the IMEI number on your Android device is through the Settings app. Follow these simple steps:

- Step 1: Open the “Settings” app on your Android device.
- Step 2: Scroll down and tap on “About phone” or “About device”.
- Step 3: Tap on “Status” or “IMEI information”.
- Step 4: You will see your IMEI number displayed on the screen. Note this down or take a screenshot for reference.
Method 2: Use the Dialer App
Another quick method to find the IMEI number is by using the dialer app on your Android smartphone. Here’s how:
- Step 1: Open the “Phone” app or “Dialer” app on your Android device.
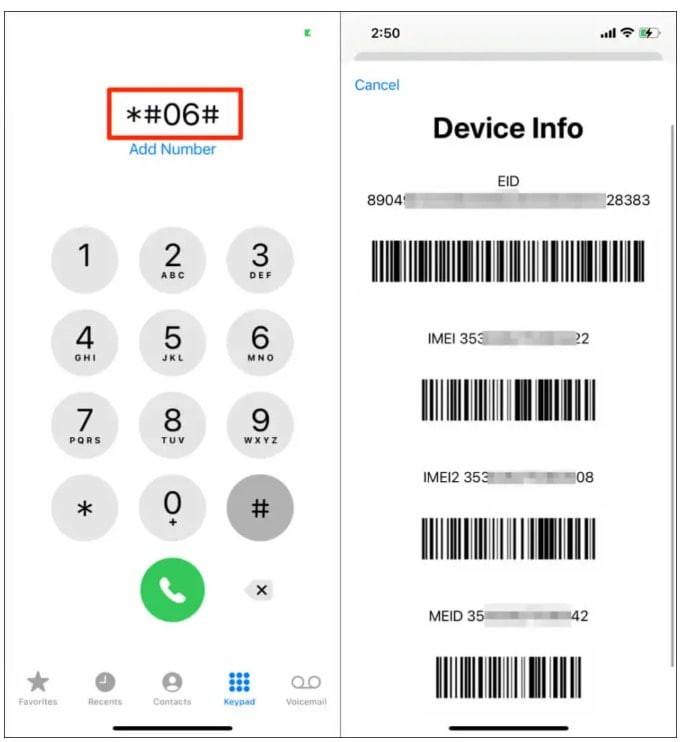
- Step 2: Dial *#06# on the keypad.
- Step 3: The IMEI number will be displayed on the screen. Note it down or take a screenshot for reference.
Method 3: Check the Vivo Y17s device Packaging or Receipt
If you still have the original packaging or receipt for your Android device, you may find the IMEI number printed on it. Look for a label or sticker on the box that contains the Vivo Y17s device’s details, including the IMEI number.
Method 4: Find IMEI on a Removable Battery (for older devices)
For older Android devices with removable batteries, you can find the IMEI number printed on a sticker underneath the battery. To locate it, follow these steps:

- Step 1: Power off your Android device.
- Step 2: Remove the back cover and take out the battery.
- Step 3: Look for a sticker or printed text with the IMEI number.
- Step 4: Note it down or take a photo for reference.
Method 5: Check the SIM Card Tray
Some Android devices have the IMEI number printed on the SIM card tray. To check if your device has this feature:

- Step 1: Power off your Android device.
- Step 2: Use the SIM card removal tool (or a paperclip) to eject the SIM card tray.
- Step 3: Look for the IMEI number printed on the tray.
- Step 4: Note it down or take a photo for reference.
Part 3: Does IMEI Change With SIM Card?
No, swapping or changing the SIM card does not alter the IMEI (International Mobile Equipment Identity). The IMEI persists unchanged throughout the Vivo Y17s device’s lifetime, functioning as a distinctive identifier solely for that particular device.
The IMEI is a 15-digit code assigned to each mobile device. It’s separate from the SIM card, which stores information related to the subscriber and the carrier network. The SIM card contains data specific to the subscriber. This includes contacts, text messages, and network-related information. But it does not alter or affect the IMEI of the Vivo Y17s device.
The IMEI remains the same even if you change SIM cards or switch between different carriers. It’s essentially a static identifier tied to the Vivo Y17s device’s hardware. It is used by mobile networks and authorities to identify and track devices on the network.
Part 4: Does IMEI Change After Factory Reset?
No, performing a factory reset on your mobile device does not change its IMEI (International Mobile Equipment Identity). The IMEI is a unique identifier assigned to the hardware of the Vivo Y17s device. It remains constant throughout the life of the Vivo Y17s device, irrespective of any software changes or resets.
A factory reset wipes the data and settings on your device, returning it to its original factory state. This process erases user-installed apps, personal data, and settings. But it doesn’t affect the Vivo Y17s device’s hardware identification, including the IMEI.
The IMEI is embedded into the hardware of the Vivo Y17s device. It is typically printed on the Vivo Y17s device’s packaging or can be found by dialing *#06# on the phone’s keypad. It’s a crucial identifier for mobile networks, and authorities use it to uniquely identify and track devices across networks. It remains unchanged even after a factory reset.
Part 5: Requirements for Changing Android IMEI without Root
Before you begin the process of changing your Android IMEI without root, there are a few things you will need:
- A compatible Android device: The methods detailed in this guide are specifically for MediaTek (MTK) devices. Ensure that your device has a MediaTek chipset before proceeding..
- A new IMEI number: You’ll need a valid IMEI number to replace the current one on your device. You can either generate one using an IMEI generator tool or use the IMEI number of an old, unused device..
- A stable internet connection: Some of the methods require you to download apps and modules, so make sure you have a stable Wi-Fi connection.
- Back up your Android phone: Before making any changes to your device, it is always recommended to backup your data. This will help you to avoid any data loss in case anything goes wrong during the process. You can back up your device data using Google Backup or a local backup software like Wondershare Dr.Fone .
Wondershare Dr.Fone is a tool that helps you keep your important data safe. It can back up all the important information on your Android phone or tablet, like photos, music, videos, contacts, and more and is compatible with over 8000 Android devices. The backup process is easy and only takes a few clicks. You can also restore your backup to any device you want, and choose which data you want to restore. This is a great way to make sure you never lose your important information!
Part 6: How to Change Android IMEI Number without Root?
There are several methods to change your Android IMEI without root access. This tutorial will cover three popular methods: using MobileUncle Tools, Xposed Installer and IMEI Changer Pro, and MTK Engineering Mode.
1. Using Xposed Installer and IMEI Changer Pro

This IMEI changer Android app is built to allow a user to change the series of numbers that make up their devices’ IMEI identification. Randomized IMEI numbers will be generated every time the app is used. However, users can type in a new IMEI number in the text field if they have a specific number in mind. This no-ads app is really simple to use–to complete the change, a user will only need to click the “Apply” button and restart their devices. Its interface is also simple enough for easy navigation.
This method involves using the Xposed Installer app to install the IMEI Changer Pro module. Follow the steps below:
- Step 1: Download and install the Xposed Installer app from a trusted source.
- Step 2: Open the app and go to the “Framework” section. Tap on “Install/Update” to install the Xposed Framework on your device. Reboot your device once the installation is complete.
- Step 3: Download and install the IMEI Changer Pro app from a trusted source.
- Step 4: Launch the Xposed Installer app again, and go to the “Modules” section. Enable the IMEI Changer Pro module by checking the box next to it.
- Step 5: Reboot your device for the changes to take effect.
- Step 6: Open the IMEI Changer Pro app and enter your new IMEI number in the provided field.
- Step 7: Tap on the “Apply” button, and then restart your device. Your new IMEI number should now be active.
2. Using MobileUncle Tools

MobileUncle Tools is a simple Android application that can retrieve your Android device’s information, back up IMEI, change its IMEI, and search for its recovery files. It will also be able to assist you with any rebooting needs and many more!
Follow these steps to change your IMEI using MobileUncle Tools:
- Step 1: Download the MobileUncle Tools app from a trusted source and install it on your device.
- Step 2: Open the app and grant the necessary permissions.
- Step 3: From the main menu, select “Engineer Mode”.
- Step 4: In the Engineer Mode, select “MTK”.
- Step 5: Scroll down and tap on “Connectivity”.
- Step 6: Next, tap on “CDS Information”.
- Step 7: Select “Radio Information”.
- Step 8: You will see two options: Phone 1 and Phone 2. Choose the one corresponding to the SIM slot for which you want to change the IMEI.
- Step 9: In the input field, type “AT+EGMR=1,7,” followed by your new IMEI number within double quotes. For example: AT+EGMR=1,7,”123456789012345”.
- Step 10: Tap on the “Send AT Command” button. You should see a message confirming that the command has been sent successfully.
- Step 11: Restart your device. The new IMEI number should now be active.
3. Using MTK Engineering Mode
![]()
MTK Engineering Mode is another app designed for MediaTek devices that allows users to access hidden settings and options. It was specifically made for Taiwanese device manufacturers such as Tecno, Infinix, Elephone, Oppo, Chuwi, etc. While not fully recommended, reports have been that it works with Android devices made by non-Taiwanese manufacturers. Its clean interface makes navigating the app seamlessly.
Follow these steps to change your IMEI using MTK Engineering Mode:

- Step 1: Download and install the MTK Engineering Mode app from a trusted source.
- Step 2: Launch the app and select “MTK Settings”.
- Step 3: Scroll down and tap on “Connectivity”.
- Step 4: Next, tap on “CDS Information”.
- Step 5: Select “Radio Information”.
- Step 6: Choose either Phone 1 or Phone 2, depending on the SIM slot for which you want to change the IMEI.
- Step 7: Enter the following command in the input field: AT+EGMR=1,7,”Your_New_IMEI_Number”.
- Step 8: Tap on the “Send AT Command” button. A confirmation message should appear.
- Step 9: Restart your device, and the new IMEI number should be active.
Part 7: How to Fix Software Errors Without Changing IMEI Number?
If the reason you are looking for IMEI number change is constant software errors, better ways exist. One of the best choices to resolve software errors on Android devices is to use Wondershare Dr.Fone . It stands as the world’s first one-click Android repair tool. Dr.Fone offers an effective solution to address a range of Android system issues.
Its functionality restores the Android system to its normal state. All of this happens without needing any specialized skills. Dr.Fone ensures a hassle-free repair process.
Key Features of Wondershare Dr.Fone
- Dr.Fone has a high success rate in resolving Android issues.
- This tool supports a wide array of mainstream Android models, including the latest Samsung devices.
- It has cemented its versatility and reliability in system repair for Android devices.
Steps to Repair Software Errors Without Changing IMEI Number via Dr.Fone
Here is how to repair all sorts of Android software issues using Dr.Fone. Follow the steps properly to repair all sorts of software errors in your Android device without changing the IMEI number:
Step 1: Navigate to Toolbox in Dr.Fone
Launch the Wondershare Dr.Fone software on your computer and navigate to the “Toolbox” section in the left panel. Connect the Android device requiring repair, then choose “System Repair” from the provided options. Proceed to the next screen, where you’ll select “Android” to start the repair process.

Step 2: Enter Your Vivo Y17s Device’s Details
You’ll proceed to a new screen, where clicking “Start” initiates the repair process. As you move to the next window, the platform will identify the “Brand” of the Vivo Y17s device. Then, choose the “Name”, “Model”, “Country”, and “Carrier”. If your device is already unlocked, select “OPEN” in the Carrier section. Afterward, mark the checkbox indicating agreement with the warning and readiness to proceed and Click “Next”.

Step 3: Put Your Vivo Y17s Device into Download Mode
When prompted, follow the on-screen instructions to enter Download Mode on your Android device. The platform will automatically commence downloading the firmware, displaying its details for verification. Opt for “Fix Now” to initiate firmware installation on your Android device.

Step 4: Complete the Android Repair Process
Remember, this repair process may result in the erasure of all data. Confirm and proceed by typing in “000000.” The system repair progress can be tracked via the progress bar on the screen. Once completed, a prompt window will confirm the process’s success. If your Android device restarts correctly, click “Done” to close the tool.

Conclusion
By using the Android IMEI changer, you will neither lose your data nor need to root your device in your pursuit of changing your device’s IMEI number. However, do remember that every situation is different, and there will come a time when you need to root your device before changing your Android’s IMEI number. We advise you to use this tutorial only for legal purposes and to check the laws and regulations in your country before attempting to change your device’s IMEI number.
You will also need the IMEI number if you want to unlock your phone and use it on another carrier provider. There are a lot of SIM Unlock services out there. It is important to choose a trustworthy and workable service to unlock your phone.
Three Ways to Sim Unlock Vivo Y17s
You probably purchased your Vivo Y17s for a significant discount but are now stuck with the same network for a couple of years. You loved the Vivo Y17s device but your network provider does not have any plans that exactly suit your needs. To release your device from your current network’s clutches, you will need to unlock your phone.
There are three ways you can do it and this post will go through each method so that you can find one that you are most comfortable with. Do note that if your contract has ended with your network provider, this “How to unlock Vivo Y17s” post can be skipped as you can just ask them to unlock your phone or purchase a sim network unlock pin for a minimal price.
Part 1: Vivo Y17s Unlock Code
This is probably the easiest, no-fuss method to sim unlock Vivo Y17s. Follow these steps carefully to successfully perform Vivo Y17s unlock code.
Do take note that this process may not work with your carrier. Therefore, always check if this is the right way to obtain the necessary code:
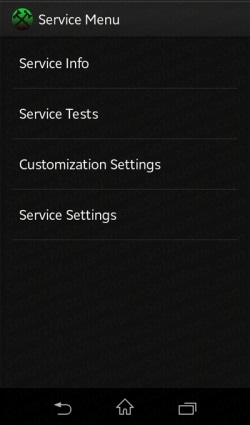
- 1. Check the SIM lock status—you can do this by dialing *#*#7378423#*#*.

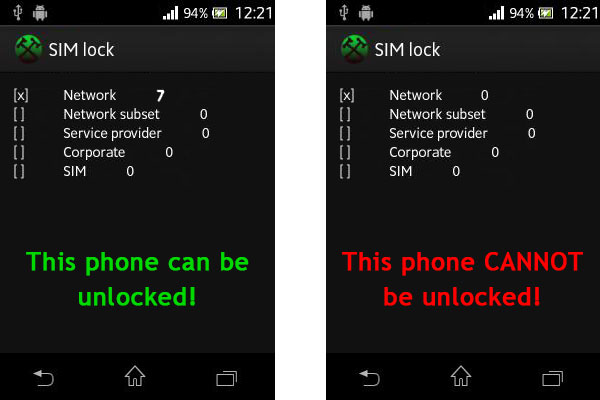
- 2. Tap Service info then Sim lock.
- 3. The number beside Network indicates how many attempts you have to unlock the phone. If it says ‘7’ it means you have seven attempts; ‘0’ simply means it is hard locked and cannot be unlocked using this method.
- 4. Find the IMEI number by dialing *#06#. Jot it down as this will be your code.
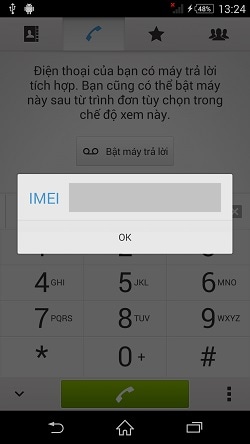
- 5. Insert your new SIM card and tap in the IMEI number when it asks you for SIM network unlock PIN.
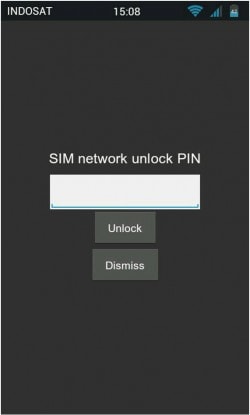
If you have followed these steps to a tee, you should have unlocked your device. If you had to abort after Step 2, look at the other two methods below.
Part 2: The Best Vivo Y17s SIM Unlock Code Generator
To safely and successfully sim unlock your Vivo Y17s, it is important to find a trustworthy sim network unlock pin software . Here I am going you present to you DoctorSIM - SIM Unlock Service. It definitely is one of the best sim unlocking code generators in the market. It helps you permanently sim unlock your phone so you can use it on any carrier provider you want in the world.
How to use SIM Unlock Service
Step 1. Visit Doctor - SIM Unlock Service official website, click on the Select Your Vivo Y17s button, and then select Vivo among all the phone brands.
Step 2. On the new window, fill in your phone IMEI number, model, your contact email, and other required information. Once your order is processed, the system will then send you the unlock code and instructions. You can follow the instruction to unlock your phone easily.
Part 3: Vivo Y17s Unlock Carrier
If your Vivo Y17s is hard locked, this is your best bet in getting your device unlocked. Actually, it is the safest method among all three:
- Get a new SIM card from a new carrier.
- Call your carrier’s customer service line and ask what are the requirements to qualify you to get your Vivo Y17s unlocked. If you have honored your contract, there should not be any problems. However, do ask your carrier if there are any additional requirements. Do note that there may be fees involved.
- Once your customer service representative has determined if you have met all their requirements, they should give you the SIM network unlock PIN Vivo Y17s. Again, depending on your carrier, they might either give you the code over the phone, through email or via SMS. If you have the choice, always opt for email or SMS so that you are able to jot down the right number.
- Once you have gotten the code, insert the new SIM card (from your new carrier). You will receive a prompt to enter your code. Make sure that you key in the right code—entering the wrong code will cause your phone to be locked (possibly forever).
Part 4: Vivo Y17s Unlock App/Software
There are some of us out there who are just not confident with doing things ourselves or trusting our own carrier.
HOWEVER, if your first instinct is to head to Google Play to look for SIM unlock tools, heed these cautions. There are currently many apps that claim that they can unlock your phone but it is just a scam. You should also avoid torrent files available online. These apps and software are usually laced with Trojans and other types of malware. So do sort through the reviews so that you will not fall into a malicious trap.
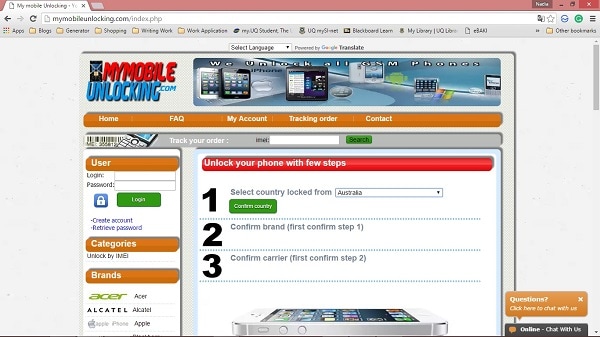
One that we can attest to is MyMobileUnlocking.com ; it is fast and affordable. Here is how you can unlock your Vivo Y17s:
- Choose your Country from the dropdown menu and click the Confirm country button.
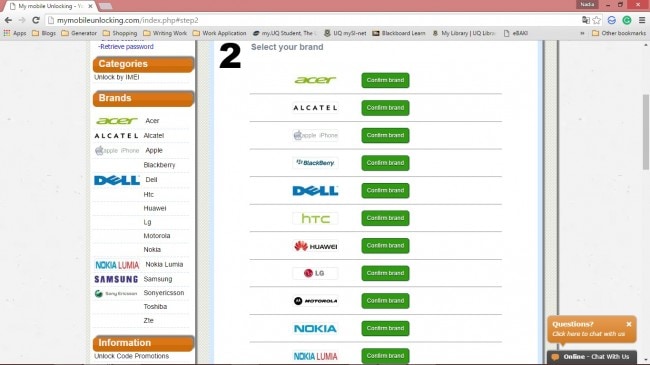
- Select your device’s Phone Brand (Vivo Ericsson) and click the Confirm brand button.
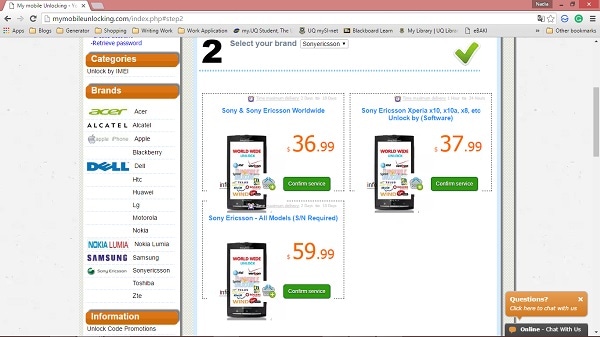
- Choose the service that you want and click the Confirm service button.
- Click the Buy now button and complete the order form.
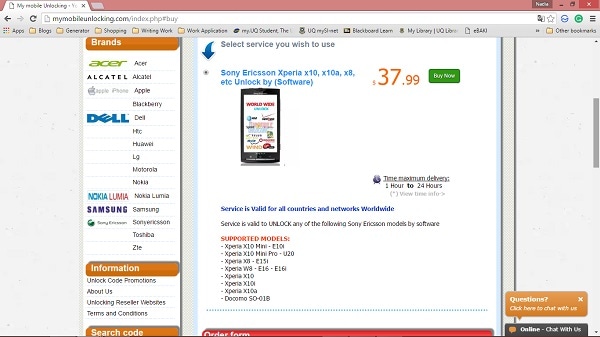
- Once you are finished, click the Place order button.
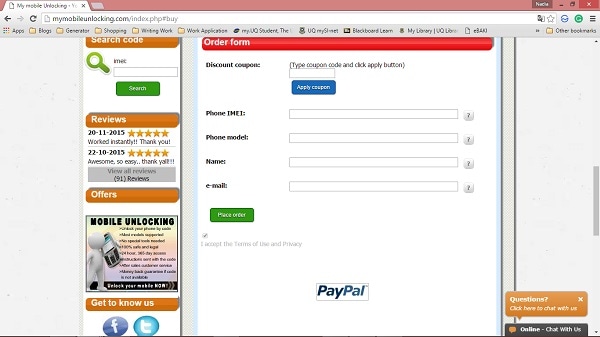
- Make payment for the service. Follow the instructions carefully.
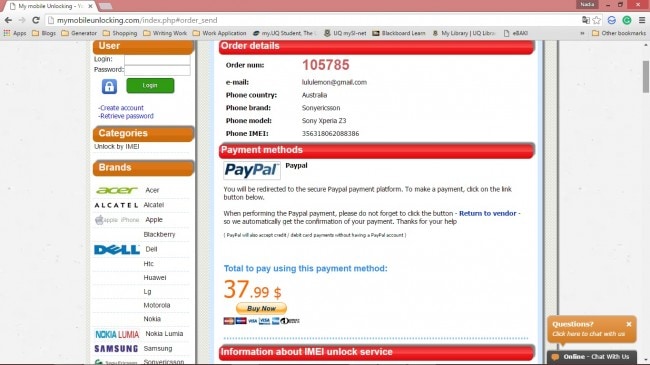
- You will then get the confirmation and code emailed to you.
- Insert your new SIM card into your Vivo Y17s device.
- Key in the code when it prompts you to do so.
Part 5: The benefits of an unlocked Vivo Y17s
If you now know how to unlock Vivo Y17s but still do not know its advantages, we are here to help.
As indicated in the introduction, unlocked phone users can freely choose the plans they subscribed to—on any carriers, in any country. Therefore, if you travel frequently around the world, having an unlocked Vivo Y17s would be beneficial. Using a local SIM card is much cheaper than paying for exorbitant roaming charges.
You can also benefit from an unlocked Vivo Y17s if you are the kind of person who likes to take advantage of current offers provided by your local carriers. Prepaid plans are always changing in terms of offering so having the flexibility of changing carriers and prepaid plans can help you save money in the long run.
Part 6: The downside of an unlocked Vivo Y17s
Are you thinking “Well, why can’t I just buy an unlocked Vivo Y17s in the first place?” right about now? Well, you can but think of the amount of money it will cost you.
For example, in Australia, an unlocked Vivo Y17s will cost around $499 from any Vivo outlet but $0 for the Vivo Y17s device when you pair it with a 24-month postpaid plan. While this may look attractive now, you may be paying more for a locked Vivo Y17s in the long run.
Conclusion
Now that you know the three ways of unlocking your Vivo Y17s, all you need to do is find one that is most compatible with you. Just remember to think of everything through and carefully. Most importantly, if you have a locked device, always seek advice from your carrier to see if this is possible.
How to Unlock SIM Card on Vivo Y17s online without jailbreak
Isn’t it so frustrating when you try to change your SIM or your network, but just can’t because your phone is locked under contract? Phones are our life source in this global age, it’s our tether to reality, to the world! But if you have a carrier locked phone, then that connection is basically under contract by an external agency! You can’t change your networks, there are limitations on how you use your phone, and when you have to travel abroad you have no option other than paying the roaming charges. If you, say, have an iPhone 5c and have these frustrations, it’s likely you’re already wondering how to unlock the iPhone 5c.
Chances are that if you’ve had a carrier locked phone for a while, you might have already forgotten what cellular freedom feels like. But we’re here to remind you. All you have to do is break that carrier-lock, and you’re good to go. However, you should be careful when doing so, cause if you try using a jailbreaking technique, it could have major repercussions. So we’re here to give you some valuable advice about how to unlock iPhone 5, iPhone 5c, or even Android phones.
Part 1: Unlock SIM Card on Vivo Y17s via jailbreak
Before we get into telling you how to unlock iPhone 5, or the SIM Card on iPhone or Android, we should first tell you what Jailbreaking is. You might have heard of this term before, and I’m sure it sounded ominous to you. Jailbreak? It sounds awfully close to ‘Prison break.’ Well, considering the carrier lock is sort of like a prison for your cell, it is an accurate terminology. But Jailbreak isn’t just about breaking the carrier lock. That might happen as a by-product, but the real purpose is to break free of the software restrictions which are generally applied to Apple devices. This might seem like a good option because, well, who doesn’t want to break free of all of Apple’s restrictions? But that always comes at several heavy risks.
Threats of unlocking SIM via Jailbreak
1. Not Permanent
This has got to be one of the biggest reasons for not jailbreaking your phone. It is not at all permanent! In fact, the moment you update your system, your jailbreak is lost and if you’ve started using a different SIM it will no longer function, and you’re gonna have to go back to using that Carrier you tried so hard to escape from! It’s really not worth the effort. Of course, you could stop updating altogether, but then that will bring us to…
2. Risky
If you don’t update your iOS, or Mac or iPad or any device at all, in this day and age, you’re basically just asking to be hacked. That is not to excuse those who do the hacking and plant malware on your system, but if you leave your front door open in a shitty neighborhood, well then you only have yourself to blame once you get robbed!
3. Warranty
Jailbreaking has now become kind-of-legal, in a very tenuous sense, but that doesn’t mean Apple wholeheartedly welcomes jailbreaking. If you do so, you will never again be able to avail of the warranty on your phone. And with the kind of major bucks you have to shell out for those iPhones, you best keep that warranty intact.
4. Lack of Apps
Many top-notch and crucial app companies and organizations simply refuse to make their applications usable in jailbreak phones, as they are extremely risky and prone to hacking. As a result, you would have to rely on a bunch of non-professional apps made by amateurs, which is more likely to put your phone in harm’s way.
5. Bricking
This basically means your whole system may crash and stop functioning. As a result, you’re gonna’ have to restore the whole thing and try to salvage whatever information you can. Now those who do jailbreak regularly will give you all kinds of excuses like it happens only rarely or that you can retrieve your data simply from the cloud, et al. But do you really want to divest all your time and energy trying to fight off malware, backing up all your data, etc, especially when there is a much more convenient option just around the corner?
Didn’t think so.
Part 2: How to unlock SIM Card on iPhone without jailbreak[Bonus]
As mentioned above, unlocking by jailbreaking is risky and only temporary. Therefore, this is not a very good choice. Honestly, a professional and reliable SIM unlock software is the best option. The good news for iPhone users is coming! Dr.Fone - Screen Unlock has launched a quality SIM unlock service for iPhone. Follow us to know more about it!
Dr.Fone - Screen Unlock (iOS)
Fast SIM Unlock for iPhone
- Supports almost all carriers, from Vodafone to Sprint.
- Move to any network operator within minutes aimlessly without data loss.
- You can unlock an iPhone without an R-SIM.
- Support newly released models from iPhone 5S to iPhone X.
3981454 people have downloaded it
How to use Dr.Fone SIM Unlock Service
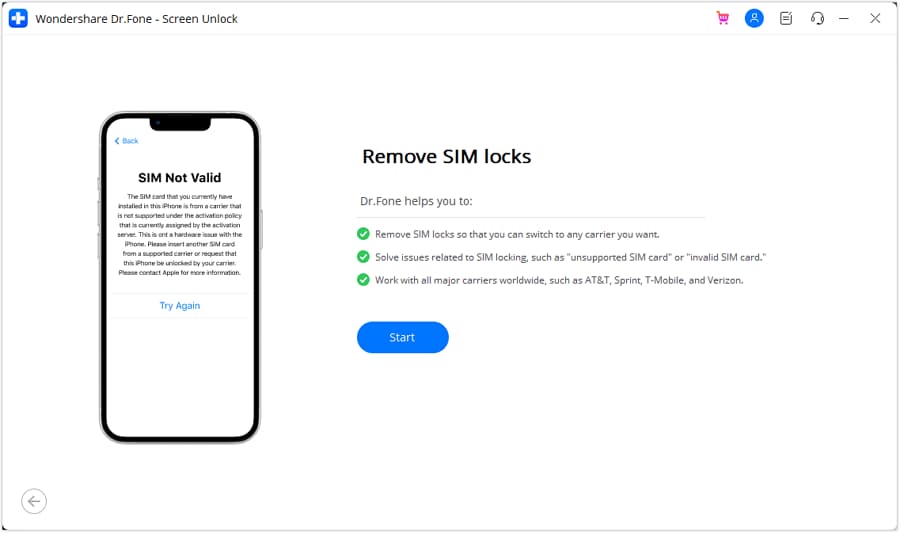
Step 1. Download Dr.Fone-Screen Unlock and click on “Remove SIM Locked”.
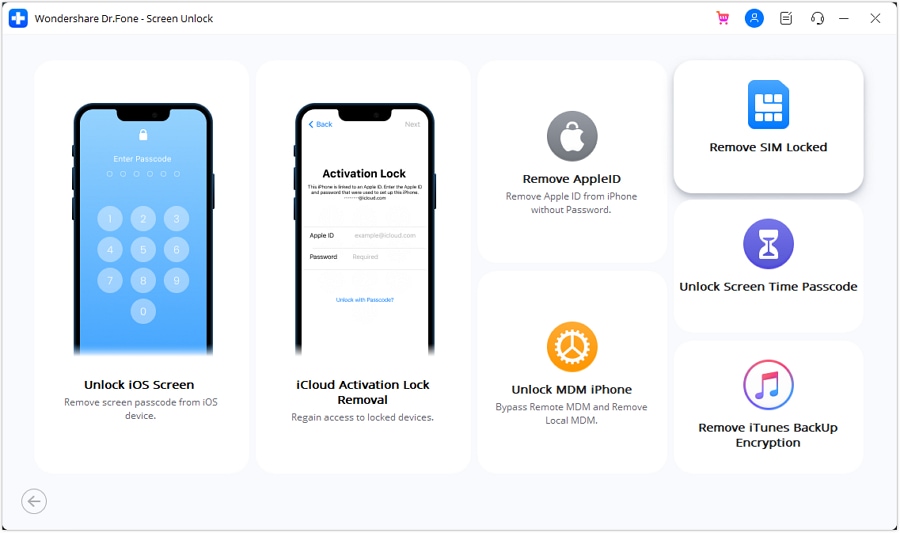
Step 2. Start authorization verification process to continue. Make sure your iPhone has connected to the computer. Click on “Confirmed” to next step.
Step 3. Your device will get a configuration profile. Then follow the guides to unlock screen. Select “Next” to continue.
Step 4. Turn off the popup page and go to “Settings → Profile Downloaded”. Then choose “Install” and type your screen passcode.
Step 5. Select “Install” on the top right and then click the button again at the bottom. After finishing the installation, turn to “Settings → General”.
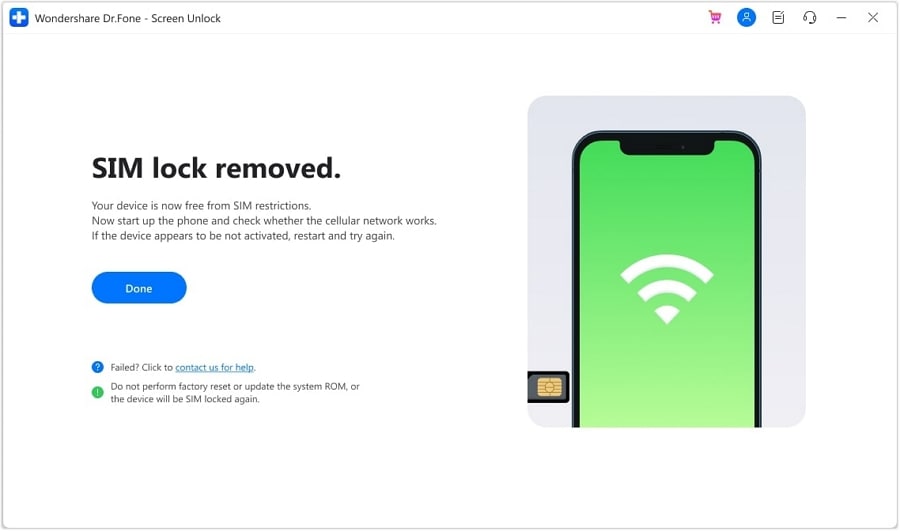
Next, detailed steps will show on your iPhone screen, just follow it! And Dr.Fone will provide “Remove Setting” services for you after the SIM lock removed to enable Wi-Fi as normal. Click on our iPhone SIM Unlock guide to learn more.
 safe & secure
Part 3: How to unlock SIM Card on iPhone and Android without jailbreak
Now that you know what not to do, i.e., jailbreak, we can finally tell you how to unlock iPhone 5 in a legal, safe and secure manner online, without jailbreaking. Up until a while back, one of the reasons people chose to jailbreak their phones is because the legitimate means was such a headache in which you had to contact the carrier and request a change, and even then they could refuse after several weeks of ‘verification.’ However, now with the slow introduction of apps that can essentially do all the work for you, within a matter of 48 hours, it really makes no sense to jailbreak. So now we’ll tell you how to unlock iPhone 5c using an Online iPhone unlock tool called DoctorSIM Unlock Service.
SIM Unlock Service is really quite the revolutionary tool which just needs your IMEI code and can do all the work for you and send you the unlock code within a guaranteed period of 48 hours! It is safe, it is legal, it is hassle-free, and it doesn’t even lapse your warranty, which proves that it is an officially approved means of unlocking your iPhone. However, before we tell you how to unlock iPhone 5, you should probably be able to verify if your phone is unlocked already.
Part 4: How to unlock SIM Card on iPhone with iPhoneIMEI.net without jailbreak
iPhoneIMEI.net uses an official method to unlock iPhone devices and whitelist your IMEI from Apple’s database. Your iPhone will be unlocked automatically Over-The-Air, simply connect it to a Wifi network (Available for iOS 7, iOS 8, iOS 9, iOS 10 or higher, iOS 6 or lower should be unlocked by iTunes). So you don’t need to send your iPhone to the network provider. The unlocked iPhone will never be relocked no matter you upgrade the OS or sync with iTunes.

How to unlock iPhone with iPhoneIMEI?
Step 1. To unlock iPhone with iPhoneIMEI, firstly go to iPhoneIMEI.net official website.
Step 2. Fill in the iPhone model, and the network provider your iPhone is locked to, and click on Unlock.
Step 3. Then fill in the IMEI number of your iPhone. Click on Unlock Now and finish the payment. After the payment is successful, iPhoneIMEI will send your IMEI number to the network provider and whitelist it from Apple activation database (You will be received an email for this change).
Step 4. Within 1-5 days, iPhoneImei will send you an email with subject “Congratulations! Your iPhone has been unlocked”. When you see that email, just simply connect your iPhone to a Wifi network and insert any SIM card, your iPhone should work instantly!
Well so now that you know all the basics of unlocking carrier phones and the risks of jailbreaking, hopefully you’ll be well equipped to make informed decisions. Of course, Dr.Fone - Screen Unlock (iOS) Service isn’t the only one available in the market right now. There are a few more. However, this is still a relatively new area, and I can tell from personal experience that the other tools and softwares aren’t completely broken in yet and are more prone to delays, errors, etc. DoctorSIM is an assuredly superior choice.
safe & secure
- Title: In 2024, Tutorial to Change Vivo Y17s IMEI without Root A Comprehensive Guide
- Author: Abner
- Created at : 2024-04-05 23:58:30
- Updated at : 2024-04-07 14:24:38
- Link: https://sim-unlock.techidaily.com/in-2024-tutorial-to-change-vivo-y17s-imei-without-root-a-comprehensive-guide-by-drfone-android/
- License: This work is licensed under CC BY-NC-SA 4.0.
