
In 2024, How To Check if Your Motorola Edge 40 Is Unlocked
How To Check if Your Motorola Edge 40 Is Unlocked
For many, securing a brand-new phone often involves the convenience of bundling it with a carrier contract. While this simplifies the initial purchase, it can lock you into a specific network. This can limit your options down the line. Knowing if your phone is unlocked becomes crucial, especially when planning an international trip, seeking better deals, or simply wanting the flexibility to switch carriers.
Thankfully, this guide will equip you with the knowledge and tools to learn how to check if your phone is unlocked. You’ll even know how to unlock it yourself if you see it’s locked. So, dive in and unlock your phone’s full potential with all the abilities this article can teach you.

Part 1: How To Check if an Android/iPhone Is Unlocked
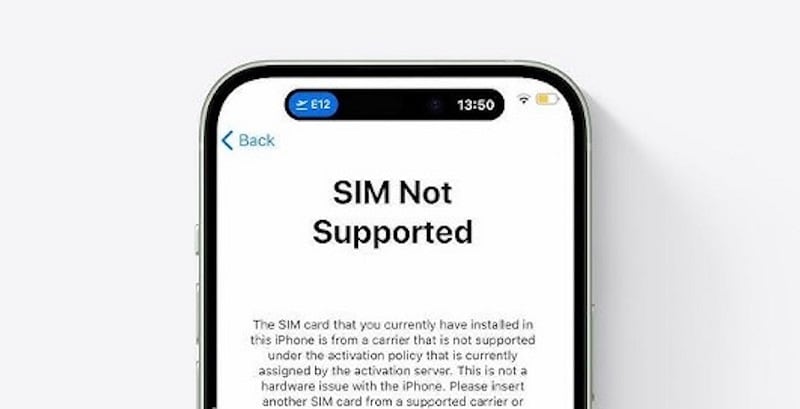
Before delving into specific methods, let’s address the most direct way to confirm your phone’s unlock status: the SIM card swap. This is one of the main ways how to tell if a phone is unlocked. Insert a SIM card from a carrier different from your current provider.
If the phone accepts the new SIM and allows calls and data usage, congratulations, your phone is unlocked! Conversely, if the phone displays an error message like “SIM Not Supported” or “Invalid SIM,” it’s likely locked to your current carrier.

How To Check if Your iPhone Is Unlocked
For iPhone users, navigating the unlock status involves a quick trip to your device settings:
- **Step 1:**Open your iPhone’s Settings app.
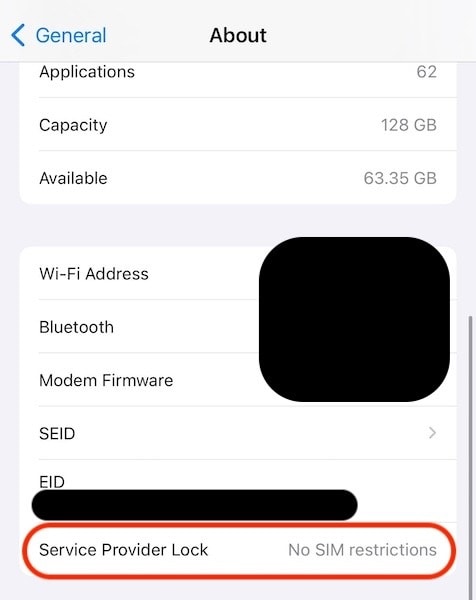
- Step 2: Navigate to General in Settings, then tap About.
- Step 3: Scroll down and check for Carrier Lock or Service Provider Lock. If it says No SIM Restrictions, your phone is unlocked. It’s easy to learn how to tell if a phone is unlocked when using an iPhone.
How To Check if Your Motorola Edge 40 Phone Is Unlocked
Android devices, with their diverse manufacturers and UI variations, require a slightly different approach:
- Step 1: Open the Settings app on your Android phone.
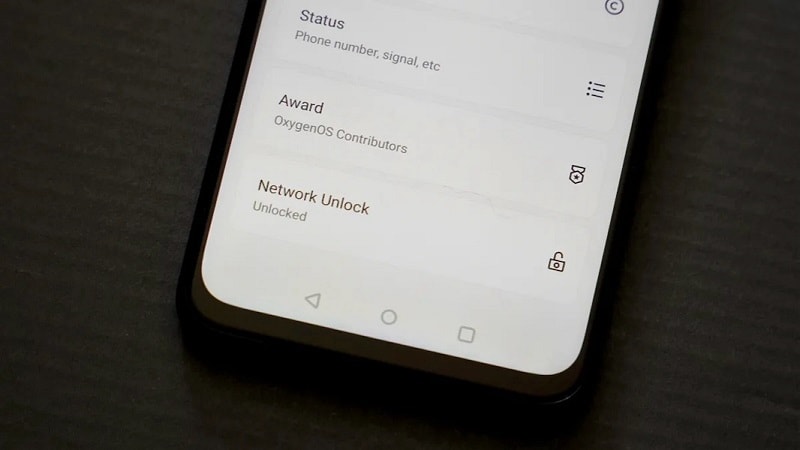
- Step 2: Explore options related to “Network” or “Mobile Network.” The specific path might vary depending on your device’s brand and model.
- Step 3: Look for options like “Network Operators,” “SIM Card Lock,” or similar. If you can search for available networks, your phone is likely unlocked. This is one of the prime ways how to check if a phone is an unlocked on Android devices.
Note: Some manufacturers offer dedicated tools or apps to check unlock status. Consult your device’s manual or website for specific instructions.
Carrier-Specific Solutions: Unlocking the Details
While the above methods provide general guidance, certain carriers might offer dedicated methods to verify the unlock status. For example, Verizon offers two ways to answer your question, “how do I know if my Verizon phone is unlocked?”
- **Contract check.**Review your Verizon contract to see if the unlock eligibility date has passed since the contract’s execution.
- **Unlocking process.**Visit the Verizon website and initiate the unlocking process. If successful, you’ll receive confirmation of your phone’s unlocked status.
Note: The process for other carriers is usually similar. Check their respective websites or contact their customer support for specific details. Asking the carrier is also a great way how to check if a phone is unlocked.
Unlocking your phone might have restrictions depending on your carrier and contract. Always check their policies and procedures before proceeding.
Part 2: How To Unlock Your Device After You Checked and It’s Locked
So, say you’ve found out your phone is still network-locked upon following the steps above. This might lead to frustration, especially if you want to put in a fresh SIM card. Thankfully, there are different ways to unlock your device when it’s still carrier-locked.
This part of the article will show two distinct methods for unlocking your phone’s carrier lock. Might it be through a third-party tool or your carrier’s official methods – this section has you covered.
Method 1: Network Unlocking With Wondershare Dr.Fone
Wondershare Dr.Fone is a comprehensive smartphone tool suite specializing in various data solutions. Its “Screen Unlock” feature specifically targets iPhone network lock removal. This makes it a great tool for unlocking your phone once you find out that it’s carrier-locked.
Dr.Fone provides a user-friendly interface and straightforward instructions for a smooth unlocking experience. The software supports many iOS versions, so you won’t have to worry about the software updates. Of course, Dr.Fone prioritizes data security during the unlocking process, keeping your valuable information safe.
Among its features, Dr.Fone’s SIM Unlock functionality empowers you to bypass carrier restrictions and unlock your phone with any compatible network provider.
How To Factory Unlock Your Motorola Edge 40 With Wondershare Dr.Fone
To unlock your phone with Wondershare Dr.Fone, follow the steps below:
Step 1: Download Wondershare Dr.Fone on your computer. Install and launch it afterward.
Step 2: Go to Toolbox > Screen Unlock > iOS.

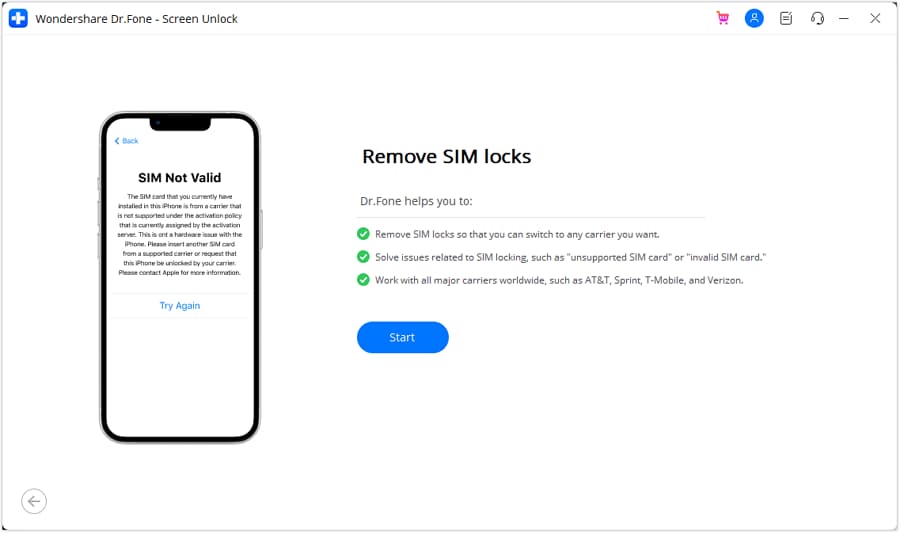
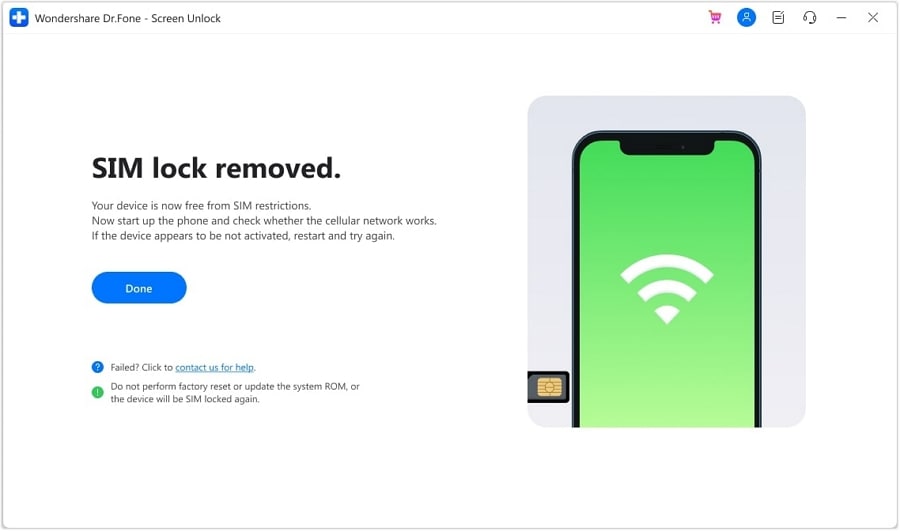
- Step 3: On this page, look for Remove SIM Locked.
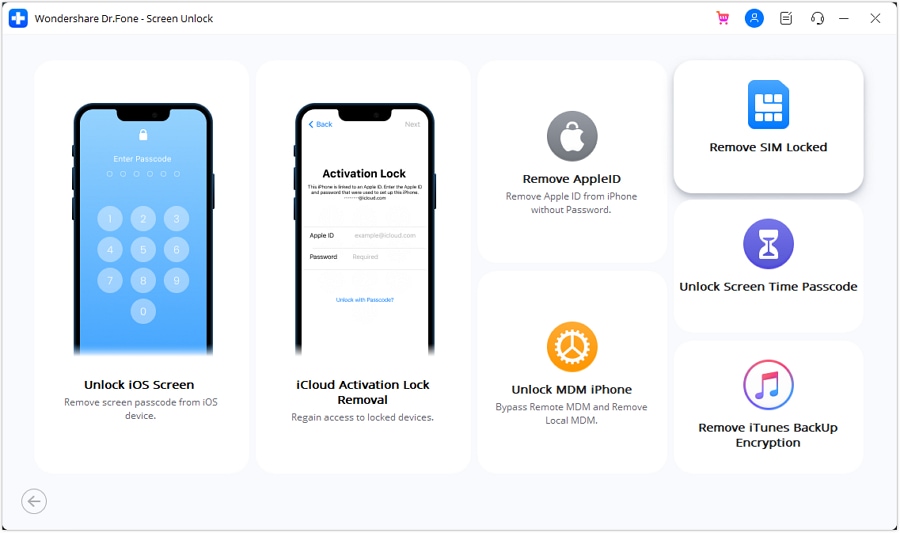
- Step 4: You will be brought to this prompt. Click Start.
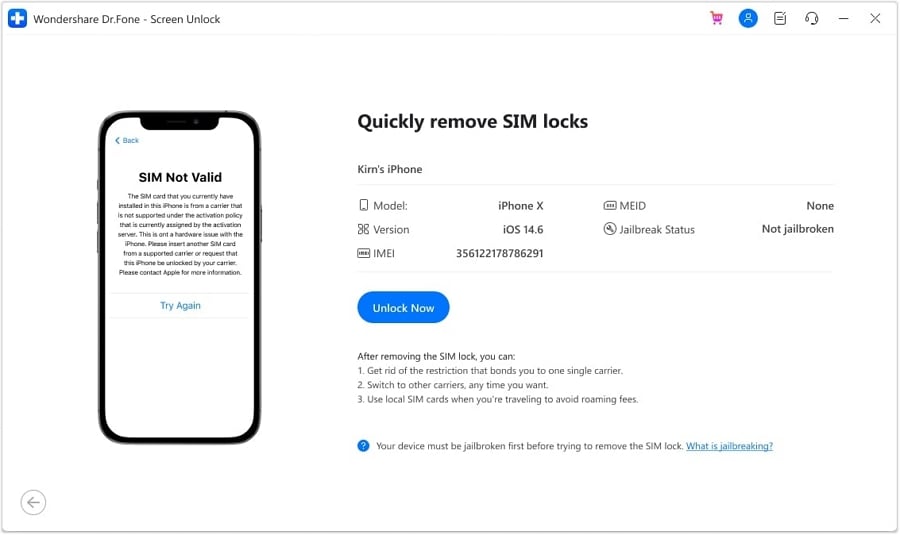
- Step 5: Wait for the program to bring up your device details. Confirm that they are correct, then click Unlock Now.
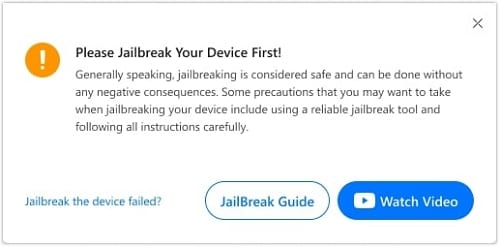
- Step 6: Notice that Dr.Fone will require you to jailbreak your iPhone before performing SIM unlock. To do this, follow the steps under JailBreak Guide or Watch Video.
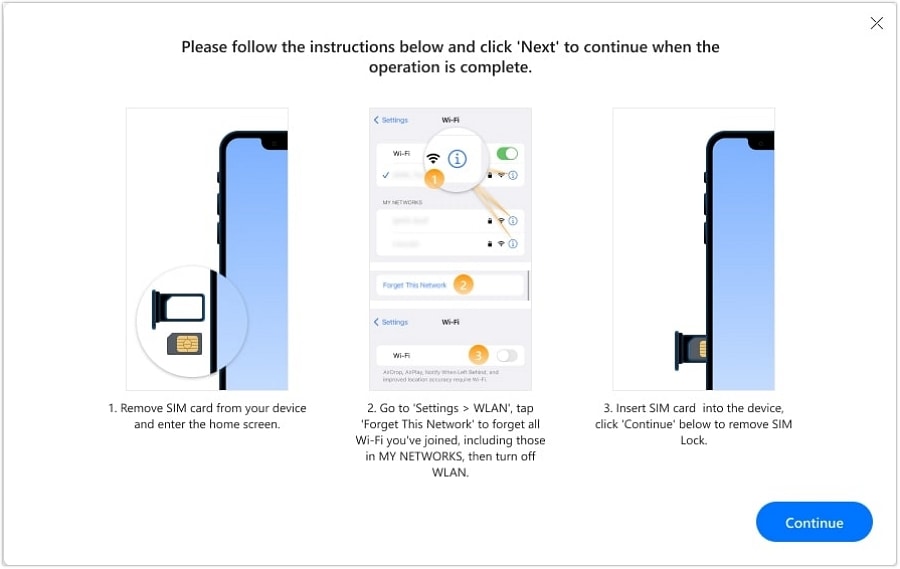
- Step 7: To ensure no issues with your Wi-Fi and other network settings, follow the steps below. Once done, click Continue.
- Step 8: Congratulations! Your phone should be unlocked by now. Follow the steps in the previous sections on how to tell if a phone is unlocked to make sure. Click Done.
Method 2: Unlocking With Your Carrier’s Official Methods
As mentioned earlier, carriers often provide official routes to unlock their devices. While typically requiring compliance with specific criteria, this method ensures you stay within your carrier’s policies.
Most carriers offer two common methods for unlocking their phones:
- **Paying an upfront fee.**If your contract period is still ongoing, certain carriers allow unlocking upon payment of a predetermined fee. Check your carrier’s website or contact customer support for eligibility and fee details.
- **Requesting a SIM unlock.**Once your contract has expired and you meet the carrier’s eligibility criteria (e.g., device payment completion), you can submit an official unlock request. Carriers typically have dedicated online portals or customer service channels for this process.
Remember, each carrier has its policies and procedures regarding unlocking. Consult your carrier’s official website or contact customer support for specific instructions and eligibility requirements.
Conclusion
Navigating the world of phone locks and restrictions can be daunting, but with the right information, you can unlock your device’s full potential. Of course, this guide taught you how to check if your phone is unlocked or not. Further, it taught you how to unlock it through official carrier channels or a trustworthy third-party tool like Wondershare Dr.Fone.
Remember, official carrier methods are always recommended, but if you face roadblocks, Dr.Fone offers a reliable alternative for various unlocking needs, including network restrictions. Don’t hesitate to explore its comprehensive data recovery suite, system repair, and more features, empowering you to manage your phone easily. With knowledge and responsible action, you can unlock a world of possibilities for your mobile device.

Tutorial to Change Motorola Edge 40 IMEI without Root: A Comprehensive Guide
As an Android device user, you may have come across a situation where you need to change your device IMEI number. The International Mobile Equipment Identity (IMEI) is a unique 15-digit number assigned to every mobile device, such as smartphones and tablets. This number serves as an identifier, helping to distinguish your device from millions of others. One of the main reasons people want to change their Android IMEI number is to unblock a device that has been blacklisted by their network provider. Other reasons include accessing certain network features and services or maintaining anonymity.
Changing your Android IMEI without root access may seem like a daunting task, but this comprehensive guide will walk you through the process step-by-step. Before proceeding, please note that altering your device’s IMEI number can be illegal in some countries, and may void your warranty. Proceed with caution and at your own risk. Get to know how to change IMEI number now!
Part 1: What is IMEI and Why People Change The IMEI Number
The International Mobile Equipment Identity (IMEI) is a unique identifier for every mobile device. It allows network providers and manufacturers to track and block devices if they are reported as lost or stolen. Changing your device’s IMEI can help to unblock a blacklisted device, access certain network features and services, or maintain anonymity. However, be aware that altering your IMEI number is illegal in some countries and may void your warranty.

There are several uses of the IMEI number
- As the use of mobile devices increases, the statistics of stolen and lost devices have been increasing as well. Users can block stolen or lost devices for further usage if they know their IMEI number. All users need to call their network carrier and report that the Motorola Edge 40 device is stolen or lost. The carrier can block the specific device from running on their network and notify other carriers.
- The 15-digit IMEI number indicates the origin and model of the Motorola Edge 40 device. The first eight digits indicate the Motorola Edge 40 device’s origin and its model while the last six digits identify the Motorola Edge 40 device’s manufacturer.
- If you subscribe to a mobile tracking service, you can use the IMEI number to track the Motorola Edge 40 device—even if it uses a different SIM card.
Pros and Cons of Changing Android IMEI
Like many other things out there, changing Android IMEI has both advantages and disadvantages. Here are some of them:
Advantages
- Make your Android untraceable. By constantly changing your IMEI, you will throw off the tracks of people using it to stalk you!
- Fix any invalid IMEI-related issues such as lost or invalid IMEI numbers. Once you change your IMEI, your Android device with the same benefits and features.
- Obtaining a completely new device ID.
- Changing the IMEI number to one that indicates it is a newer model, you will be able to enjoy new OS updates by resetting, repairing, and updating your Android device.
- Have you ever yearned for that cheap BlackBerry plan your network carrier keeps on promoting? The 15-digit IMEI indicates the origin and model of your device. Therefore, by changing your Android’s IMEI number to that of a BlackBerry’s, you will be able to subscribe to a cheaper mobile plan.
Disadvantages
- Before we begin, we need to make it clear that the process of changing IMEI without root can be illegal in some countries. We advise you to check the laws and regulations in your country before attempting to change your device’s IMEI number. As far as we know, it is legal in Africa and Asia, and illegal in Europe.
- The IMEI number is hardcoded into your device. Therefore, changing your device’s IMEI number may void your device warranty and cause other issues such as network problems and software instability.
- Legally, you have forfeited your ownership of your mobile device. When you purchase your device, the seller will jot down the original IMEI number on your receipt. So if you changed your IMEI and lost it, you may not be able to claim it. This is because authorities cannot see if it is truly yours. After all, the IMEI numbers no longer correlate with each other.
Part 2: How to Find the IMEI on an Android? (5 Ways)
It is essential to know your Android device’s IMEI for various reasons, such as registering the Motorola Edge 40 device, reporting it as stolen or lost, checking warranty status, or verifying its authenticity. In this part, we will walk you through the various methods on how to find the IMEI on your Android device.
Method 1: Locate IMEI through the Settings App
One of the easiest ways to find the IMEI number on your Android device is through the Settings app. Follow these simple steps:

- Step 1: Open the “Settings” app on your Android device.
- Step 2: Scroll down and tap on “About phone” or “About device”.
- Step 3: Tap on “Status” or “IMEI information”.
- Step 4: You will see your IMEI number displayed on the screen. Note this down or take a screenshot for reference.
Method 2: Use the Dialer App
Another quick method to find the IMEI number is by using the dialer app on your Android smartphone. Here’s how:
- Step 1: Open the “Phone” app or “Dialer” app on your Android device.
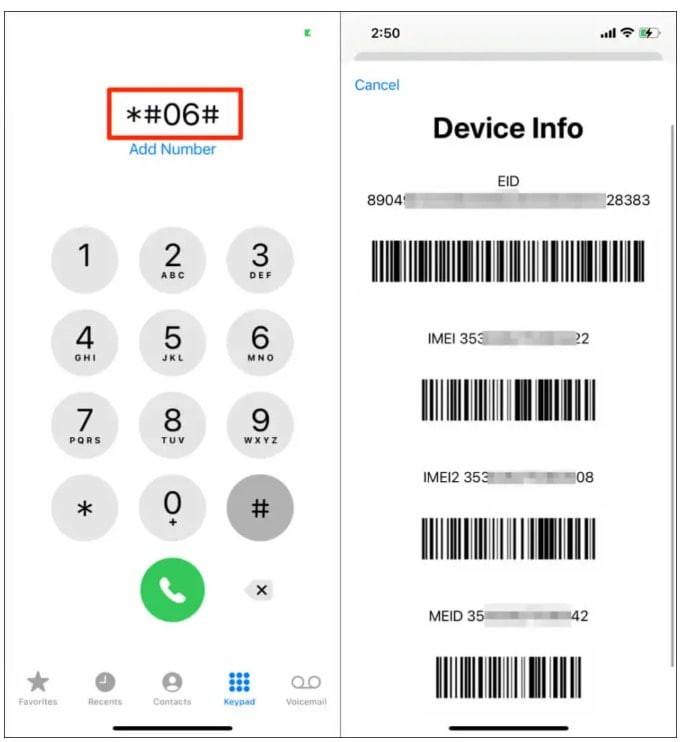
- Step 2: Dial *#06# on the keypad.
- Step 3: The IMEI number will be displayed on the screen. Note it down or take a screenshot for reference.
Method 3: Check the Motorola Edge 40 device Packaging or Receipt
If you still have the original packaging or receipt for your Android device, you may find the IMEI number printed on it. Look for a label or sticker on the box that contains the Motorola Edge 40 device’s details, including the IMEI number.
Method 4: Find IMEI on a Removable Battery (for older devices)
For older Android devices with removable batteries, you can find the IMEI number printed on a sticker underneath the battery. To locate it, follow these steps:

- Step 1: Power off your Android device.
- Step 2: Remove the back cover and take out the battery.
- Step 3: Look for a sticker or printed text with the IMEI number.
- Step 4: Note it down or take a photo for reference.
Method 5: Check the SIM Card Tray
Some Android devices have the IMEI number printed on the SIM card tray. To check if your device has this feature:

- Step 1: Power off your Android device.
- Step 2: Use the SIM card removal tool (or a paperclip) to eject the SIM card tray.
- Step 3: Look for the IMEI number printed on the tray.
- Step 4: Note it down or take a photo for reference.
Part 3: Does IMEI Change With SIM Card?
No, swapping or changing the SIM card does not alter the IMEI (International Mobile Equipment Identity). The IMEI persists unchanged throughout the Motorola Edge 40 device’s lifetime, functioning as a distinctive identifier solely for that particular device.
The IMEI is a 15-digit code assigned to each mobile device. It’s separate from the SIM card, which stores information related to the subscriber and the carrier network. The SIM card contains data specific to the subscriber. This includes contacts, text messages, and network-related information. But it does not alter or affect the IMEI of the Motorola Edge 40 device.
The IMEI remains the same even if you change SIM cards or switch between different carriers. It’s essentially a static identifier tied to the Motorola Edge 40 device’s hardware. It is used by mobile networks and authorities to identify and track devices on the network.
Part 4: Does IMEI Change After Factory Reset?
No, performing a factory reset on your mobile device does not change its IMEI (International Mobile Equipment Identity). The IMEI is a unique identifier assigned to the hardware of the Motorola Edge 40 device. It remains constant throughout the life of the Motorola Edge 40 device, irrespective of any software changes or resets.
A factory reset wipes the data and settings on your device, returning it to its original factory state. This process erases user-installed apps, personal data, and settings. But it doesn’t affect the Motorola Edge 40 device’s hardware identification, including the IMEI.
The IMEI is embedded into the hardware of the Motorola Edge 40 device. It is typically printed on the Motorola Edge 40 device’s packaging or can be found by dialing *#06# on the phone’s keypad. It’s a crucial identifier for mobile networks, and authorities use it to uniquely identify and track devices across networks. It remains unchanged even after a factory reset.
Part 5: Requirements for Changing Android IMEI without Root
Before you begin the process of changing your Android IMEI without root, there are a few things you will need:
- A compatible Android device: The methods detailed in this guide are specifically for MediaTek (MTK) devices. Ensure that your device has a MediaTek chipset before proceeding..
- A new IMEI number: You’ll need a valid IMEI number to replace the current one on your device. You can either generate one using an IMEI generator tool or use the IMEI number of an old, unused device..
- A stable internet connection: Some of the methods require you to download apps and modules, so make sure you have a stable Wi-Fi connection.
- Back up your Android phone: Before making any changes to your device, it is always recommended to backup your data. This will help you to avoid any data loss in case anything goes wrong during the process. You can back up your device data using Google Backup or a local backup software like Wondershare Dr.Fone .
Wondershare Dr.Fone is a tool that helps you keep your important data safe. It can back up all the important information on your Android phone or tablet, like photos, music, videos, contacts, and more and is compatible with over 8000 Android devices. The backup process is easy and only takes a few clicks. You can also restore your backup to any device you want, and choose which data you want to restore. This is a great way to make sure you never lose your important information!
Part 6: How to Change Android IMEI Number without Root?
There are several methods to change your Android IMEI without root access. This tutorial will cover three popular methods: using MobileUncle Tools, Xposed Installer and IMEI Changer Pro, and MTK Engineering Mode.
1. Using Xposed Installer and IMEI Changer Pro

This IMEI changer Android app is built to allow a user to change the series of numbers that make up their devices’ IMEI identification. Randomized IMEI numbers will be generated every time the app is used. However, users can type in a new IMEI number in the text field if they have a specific number in mind. This no-ads app is really simple to use–to complete the change, a user will only need to click the “Apply” button and restart their devices. Its interface is also simple enough for easy navigation.
This method involves using the Xposed Installer app to install the IMEI Changer Pro module. Follow the steps below:
- Step 1: Download and install the Xposed Installer app from a trusted source.
- Step 2: Open the app and go to the “Framework” section. Tap on “Install/Update” to install the Xposed Framework on your device. Reboot your device once the installation is complete.
- Step 3: Download and install the IMEI Changer Pro app from a trusted source.
- Step 4: Launch the Xposed Installer app again, and go to the “Modules” section. Enable the IMEI Changer Pro module by checking the box next to it.
- Step 5: Reboot your device for the changes to take effect.
- Step 6: Open the IMEI Changer Pro app and enter your new IMEI number in the provided field.
- Step 7: Tap on the “Apply” button, and then restart your device. Your new IMEI number should now be active.
2. Using MobileUncle Tools

MobileUncle Tools is a simple Android application that can retrieve your Android device’s information, back up IMEI, change its IMEI, and search for its recovery files. It will also be able to assist you with any rebooting needs and many more!
Follow these steps to change your IMEI using MobileUncle Tools:
- Step 1: Download the MobileUncle Tools app from a trusted source and install it on your device.
- Step 2: Open the app and grant the necessary permissions.
- Step 3: From the main menu, select “Engineer Mode”.
- Step 4: In the Engineer Mode, select “MTK”.
- Step 5: Scroll down and tap on “Connectivity”.
- Step 6: Next, tap on “CDS Information”.
- Step 7: Select “Radio Information”.
- Step 8: You will see two options: Phone 1 and Phone 2. Choose the one corresponding to the SIM slot for which you want to change the IMEI.
- Step 9: In the input field, type “AT+EGMR=1,7,” followed by your new IMEI number within double quotes. For example: AT+EGMR=1,7,”123456789012345”.
- Step 10: Tap on the “Send AT Command” button. You should see a message confirming that the command has been sent successfully.
- Step 11: Restart your device. The new IMEI number should now be active.
3. Using MTK Engineering Mode

![]()
MTK Engineering Mode is another app designed for MediaTek devices that allows users to access hidden settings and options. It was specifically made for Taiwanese device manufacturers such as Tecno, Infinix, Elephone, Oppo, Chuwi, etc. While not fully recommended, reports have been that it works with Android devices made by non-Taiwanese manufacturers. Its clean interface makes navigating the app seamlessly.
Follow these steps to change your IMEI using MTK Engineering Mode:

- Step 1: Download and install the MTK Engineering Mode app from a trusted source.
- Step 2: Launch the app and select “MTK Settings”.
- Step 3: Scroll down and tap on “Connectivity”.
- Step 4: Next, tap on “CDS Information”.
- Step 5: Select “Radio Information”.
- Step 6: Choose either Phone 1 or Phone 2, depending on the SIM slot for which you want to change the IMEI.
- Step 7: Enter the following command in the input field: AT+EGMR=1,7,”Your_New_IMEI_Number”.
- Step 8: Tap on the “Send AT Command” button. A confirmation message should appear.
- Step 9: Restart your device, and the new IMEI number should be active.
Part 7: How to Fix Software Errors Without Changing IMEI Number?
If the reason you are looking for IMEI number change is constant software errors, better ways exist. One of the best choices to resolve software errors on Android devices is to use Wondershare Dr.Fone . It stands as the world’s first one-click Android repair tool. Dr.Fone offers an effective solution to address a range of Android system issues.
Its functionality restores the Android system to its normal state. All of this happens without needing any specialized skills. Dr.Fone ensures a hassle-free repair process.
Key Features of Wondershare Dr.Fone
- Dr.Fone has a high success rate in resolving Android issues.
- This tool supports a wide array of mainstream Android models, including the latest Samsung devices.
- It has cemented its versatility and reliability in system repair for Android devices.
Steps to Repair Software Errors Without Changing IMEI Number via Dr.Fone
Here is how to repair all sorts of Android software issues using Dr.Fone. Follow the steps properly to repair all sorts of software errors in your Android device without changing the IMEI number:
Step 1: Navigate to Toolbox in Dr.Fone
Launch the Wondershare Dr.Fone software on your computer and navigate to the “Toolbox” section in the left panel. Connect the Android device requiring repair, then choose “System Repair” from the provided options. Proceed to the next screen, where you’ll select “Android” to start the repair process.

Step 2: Enter Your Motorola Edge 40 Device’s Details
You’ll proceed to a new screen, where clicking “Start” initiates the repair process. As you move to the next window, the platform will identify the “Brand” of the Motorola Edge 40 device. Then, choose the “Name”, “Model”, “Country”, and “Carrier”. If your device is already unlocked, select “OPEN” in the Carrier section. Afterward, mark the checkbox indicating agreement with the warning and readiness to proceed and Click “Next”.

Step 3: Put Your Motorola Edge 40 Device into Download Mode
When prompted, follow the on-screen instructions to enter Download Mode on your Android device. The platform will automatically commence downloading the firmware, displaying its details for verification. Opt for “Fix Now” to initiate firmware installation on your Android device.

Step 4: Complete the Android Repair Process
Remember, this repair process may result in the erasure of all data. Confirm and proceed by typing in “000000.” The system repair progress can be tracked via the progress bar on the screen. Once completed, a prompt window will confirm the process’s success. If your Android device restarts correctly, click “Done” to close the tool.

Conclusion
By using the Android IMEI changer, you will neither lose your data nor need to root your device in your pursuit of changing your device’s IMEI number. However, do remember that every situation is different, and there will come a time when you need to root your device before changing your Android’s IMEI number. We advise you to use this tutorial only for legal purposes and to check the laws and regulations in your country before attempting to change your device’s IMEI number.
You will also need the IMEI number if you want to unlock your phone and use it on another carrier provider. There are a lot of SIM Unlock services out there. It is important to choose a trustworthy and workable service to unlock your phone.
Android Unlock Code: Sim Unlock Your Motorola Edge 40 Phone and Remove Locked Screen
When you buy a phone, your matter of concern is whether to buy a locked phone or an unlocked Phone. Locked phones may look much safer to you, but they are very inconvenient when it comes to normal use. These phones are bound to one carrier only, which is their biggest disadvantage. At the same time, unlocked phones save you from this hassle.
If you’ve bought a locked phone and facing problems, you need not worry as there are multiple ways to unlock your phone. For that, this article has provided the solution to your issue in the most intelligible way.
Part 1: Difference between Unlocking, Rooting, and Jailbreaking
This part of the article shall differ from three very similar terms, Unlocking, Rooting, and Jailbreaking, to clear your confusion.
Unlocking
Unlocking a phone means making it compatible with other SIM carriers. An unlocked phone is not pinned to a single SIM carrier; rather, it lets you switch carriers. SIM Card lets your phone connect to a specific network, but it depends on your phone’s hardware compatibility. If it’s not compatible with a specific network, then nothing can change that.
To unlock your phone, you have to enter a specific code to remove the restrictions of the network. However, there are ways to unlock your phone without granting permission from the network.
Rooting (for Android)

Rooting a phone means gaining “root access” on another phone. This process works for Android only. However, it can also be used on some specific Linux-based devices. Root access allows you to do almost everything on the phone you’ve gained access to, like installing or uninstalling applications or changing the settings.
Root access is not all fun, and games as this process will lead you to the security architect of your operating system, which will be hard to deal with even if you’re a professional. So, it’s important to be careful with this process, else you will have to bear the consequences.
Jailbreaking (for iOS)

Jailbreaking a device means removing all the restrictions on that device that its manufacturer’s applied. This process works specifically for Apple devices. It lets you bypass the limitations and restrictions, so you can modify the software your way and make changes to the default program. It is also considered free booting, and Apple or any other company does not approve of it.
In summary, unlocking is primarily about freeing a device from carrier restrictions, rooting is specific to Android devices and involves gaining administrative access, while jailbreaking is specific to iOS devices and involves bypassing Apple’s restrictions for more customization. All these processes come with potential risks and may void warranties, so users should carefully consider the implications before proceeding.
It is advisable to always go for the safest method, unlocking your phone. Rooting and Jailbreaking are risky security exploitations that can cause serious problems.
Part 2: Is it Legally Allowed to Unlock Your Motorola Edge 40?
Every country has its own rules and regulations. Similarly, laws regarding unlocking your phones are different in different countries. However, after sessions of deliberations and consultations, the US has declared it legal to unlock your phone.
In order to legally unlock your phone, you must make sure your phone service contracts, payments, and dues are cleared. You must be the sole owner of your phone. Once your phone is eligible and falls under the requirements, you will be given an “Unlock Code” to proceed further.

Part 3: Free Ways to Perform Android SIM Efficiently
This part of the article will briefly explain some efficient and free-of-cost ways to unlock your SIM.
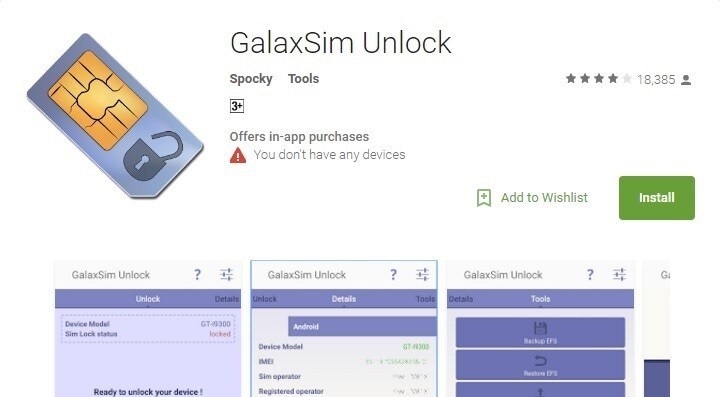
Method 1. Unlock your SIM through GalaxSim Unlock
GalaxSim is an effective application for unlocking your SIM. Its user-friendly interface is designed in such a way that every other person can use it even if you have no knowledge of tech. It automatically backs up data on Google Drive, and if there are errors, it detects them right away.
Here is a small step-by-step guide to using GalaxSim on Android, as it is only compatible with Galaxy series phones.
- Step 1. Launch GalaxSim
The first and foremost step is to install GalaxSim from Google Play Store on your Android device.
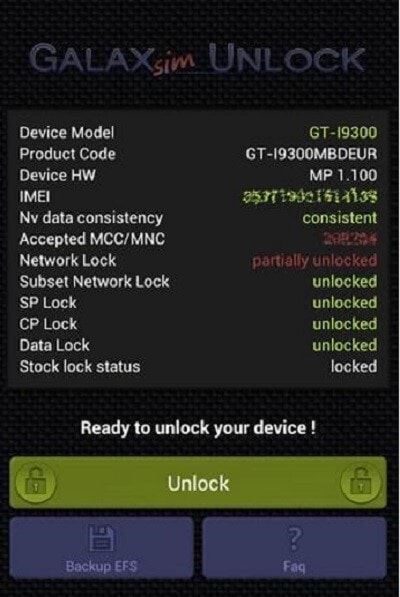
- Step 2. Phone Status
Once GalaxSim is downloaded, open the application and allow it to run on your device. Now, it will show you whether your phone and its systems are locked or unlocked.
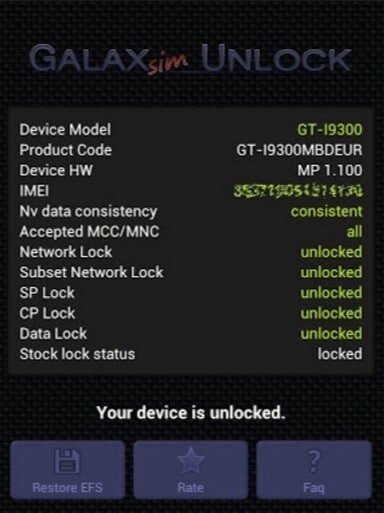
- Step 3. Unlock your Phone
Under your phone’s status, click on “Unlock” to continue. After the process is completed, your phone will be unlocked successfully.
Method 2. Unlock SIM through Free Code
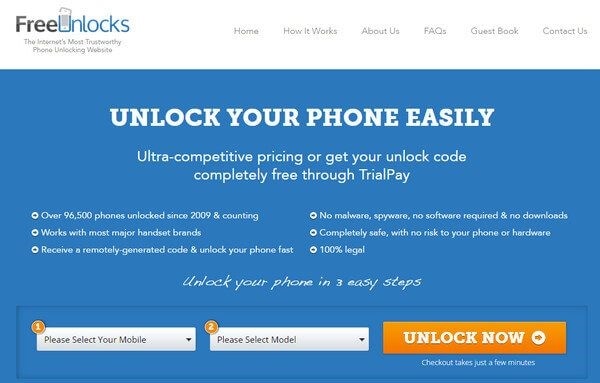
FreeUnlocks is the most trusted phone unlocking website on the Internet. It is completely safe as the code is given to you safely and sounds on you on your email only. It is compatible with all phones as it is available online and free of all malicious software.
The following are the steps to use FreeUnlocks to get your free code.
- Step 1. Confirm your Device
Choose your device name and device model first. Then click on “Unlock Now” to start the process.
- Step 2. TrialPay for Free Code
Now you’ll be given two options on the screen, “PayPal” or “TrialPay”. If you want to do it free of cost, select “TrialPay” to proceed to unlock your device. However, it depends on your personal preference; you can select “PayPal” if you want to enjoy more features.
- Step 3. Remote Email
You’ll receive an email immediately, and all you have to do is, enter the unlock code, and there you have it, your SIM unlocked.
Bonus Tips: How to Unlock Android Screen Precisely with Dr.Fone Screen Unlock?
Wondershare Dr.Fone - Screen Unlock (Android) has yet, another time, taken the lead in this matter too. This convenient multifunctional software is a go-to software for everyone who has knowledge of tech as it provides solutions for your software and hardware problems under one roof. While it may seem like big trouble on your end, it’s just a matter of a few minutes for Dr.Fone to fix your issue.
 safe & secure
Wondershare Dr.Fone is the best solution to unlock your Android device as it
- Removes all kinds of locks, be it fingerprint, password, unlock code or pattern, and PIN.
- Bypass Android FRP lock without a PIN or Google account.
- Compatible with almost all Android devices.
- A completely safe tool. No risk of hacking or virus attack.
- Very convenient and easy-to-use software for amateurs and professionals as well.
Moreover, Samsung and LG devices can be unlocked using Dr.Fone without losing any data, whereas this is not the case with other phones. In order to unlock the Android screen precisely with Dr.Fone Screen Unlock, you have to follow the given steps:
- Step 1: Install Wondershare Dr.Fone
Install Wondershare Dr.Fone on your PC and connect your Android device to your PC via cable.
- Step 2: Unlock your Android Phone
Select “Screen Unlock” on the home interface among the other given options. Once your PC detects your phone, another interface will be displayed on the screen. Now, select “Unlock Android Screen”.

- Step 3: Confirm your Device
Now, select your Device to proceed on. Dr.Fone will guide your Android device into the specific mode automatically.

- Step 4: Remove Password
Once your device model matches and your device enters the specific mode, the software will automatically start unlocking. This way, your password will be removed successfully, and you can easily unlock and access your Android device.

Part 5: Tip to Avoid the SIM Lock Issue
In order to avoid the SIM Lock issue, it is advisable to use unlocked phones. This will save you from long-term hassle as you will have the freedom to switch carriers and SIM cards whenever you like. On the other hand, if we talk about locked phones, they’re expensive and a headache to deal with because of the requirements and problems they come with.
If you’re concerned about a dual-SIM phone, then you can have one SIM pinned to a good quality carrier. The other SIM can be temporary and cheap. This is an amazing option for you if you’re traveling, as you’ll have the flexibility to change carriers for the temporary SIM no matter wherever you are.
Conclusion
As a crux, an unlocked phone is a better choice than a locked phone. We would personally advise you to go for unlocked phones as this will save your time and money. You will have much more freedom and flexibility for changing between SIM and SIM carriers. Whereas on the locked phones, you will be bound to one SIM. So, the next time you decide to buy a phone, give this article a read again.
- Title: In 2024, How To Check if Your Motorola Edge 40 Is Unlocked
- Author: Abner
- Created at : 2024-07-16 14:21:34
- Updated at : 2024-07-17 14:21:34
- Link: https://sim-unlock.techidaily.com/in-2024-how-to-check-if-your-motorola-edge-40-is-unlocked-by-drfone-android/
- License: This work is licensed under CC BY-NC-SA 4.0.